


Hello, everyone! This week I put together a little tutorial for my everyday eye makeup using the Urban Decay Naked 2 palette.
Eyeshadow was my initial makeup love, the very first one that stole my heart. Urban Decay was also the original makeup brand that caught my attention. Their vivacious colors and unapologetic names intrigued me, prompting me to further investigate and accumulate a large collection of their products. And from there, the rest was history and I have yet to look back. So, without further ado, here we go!
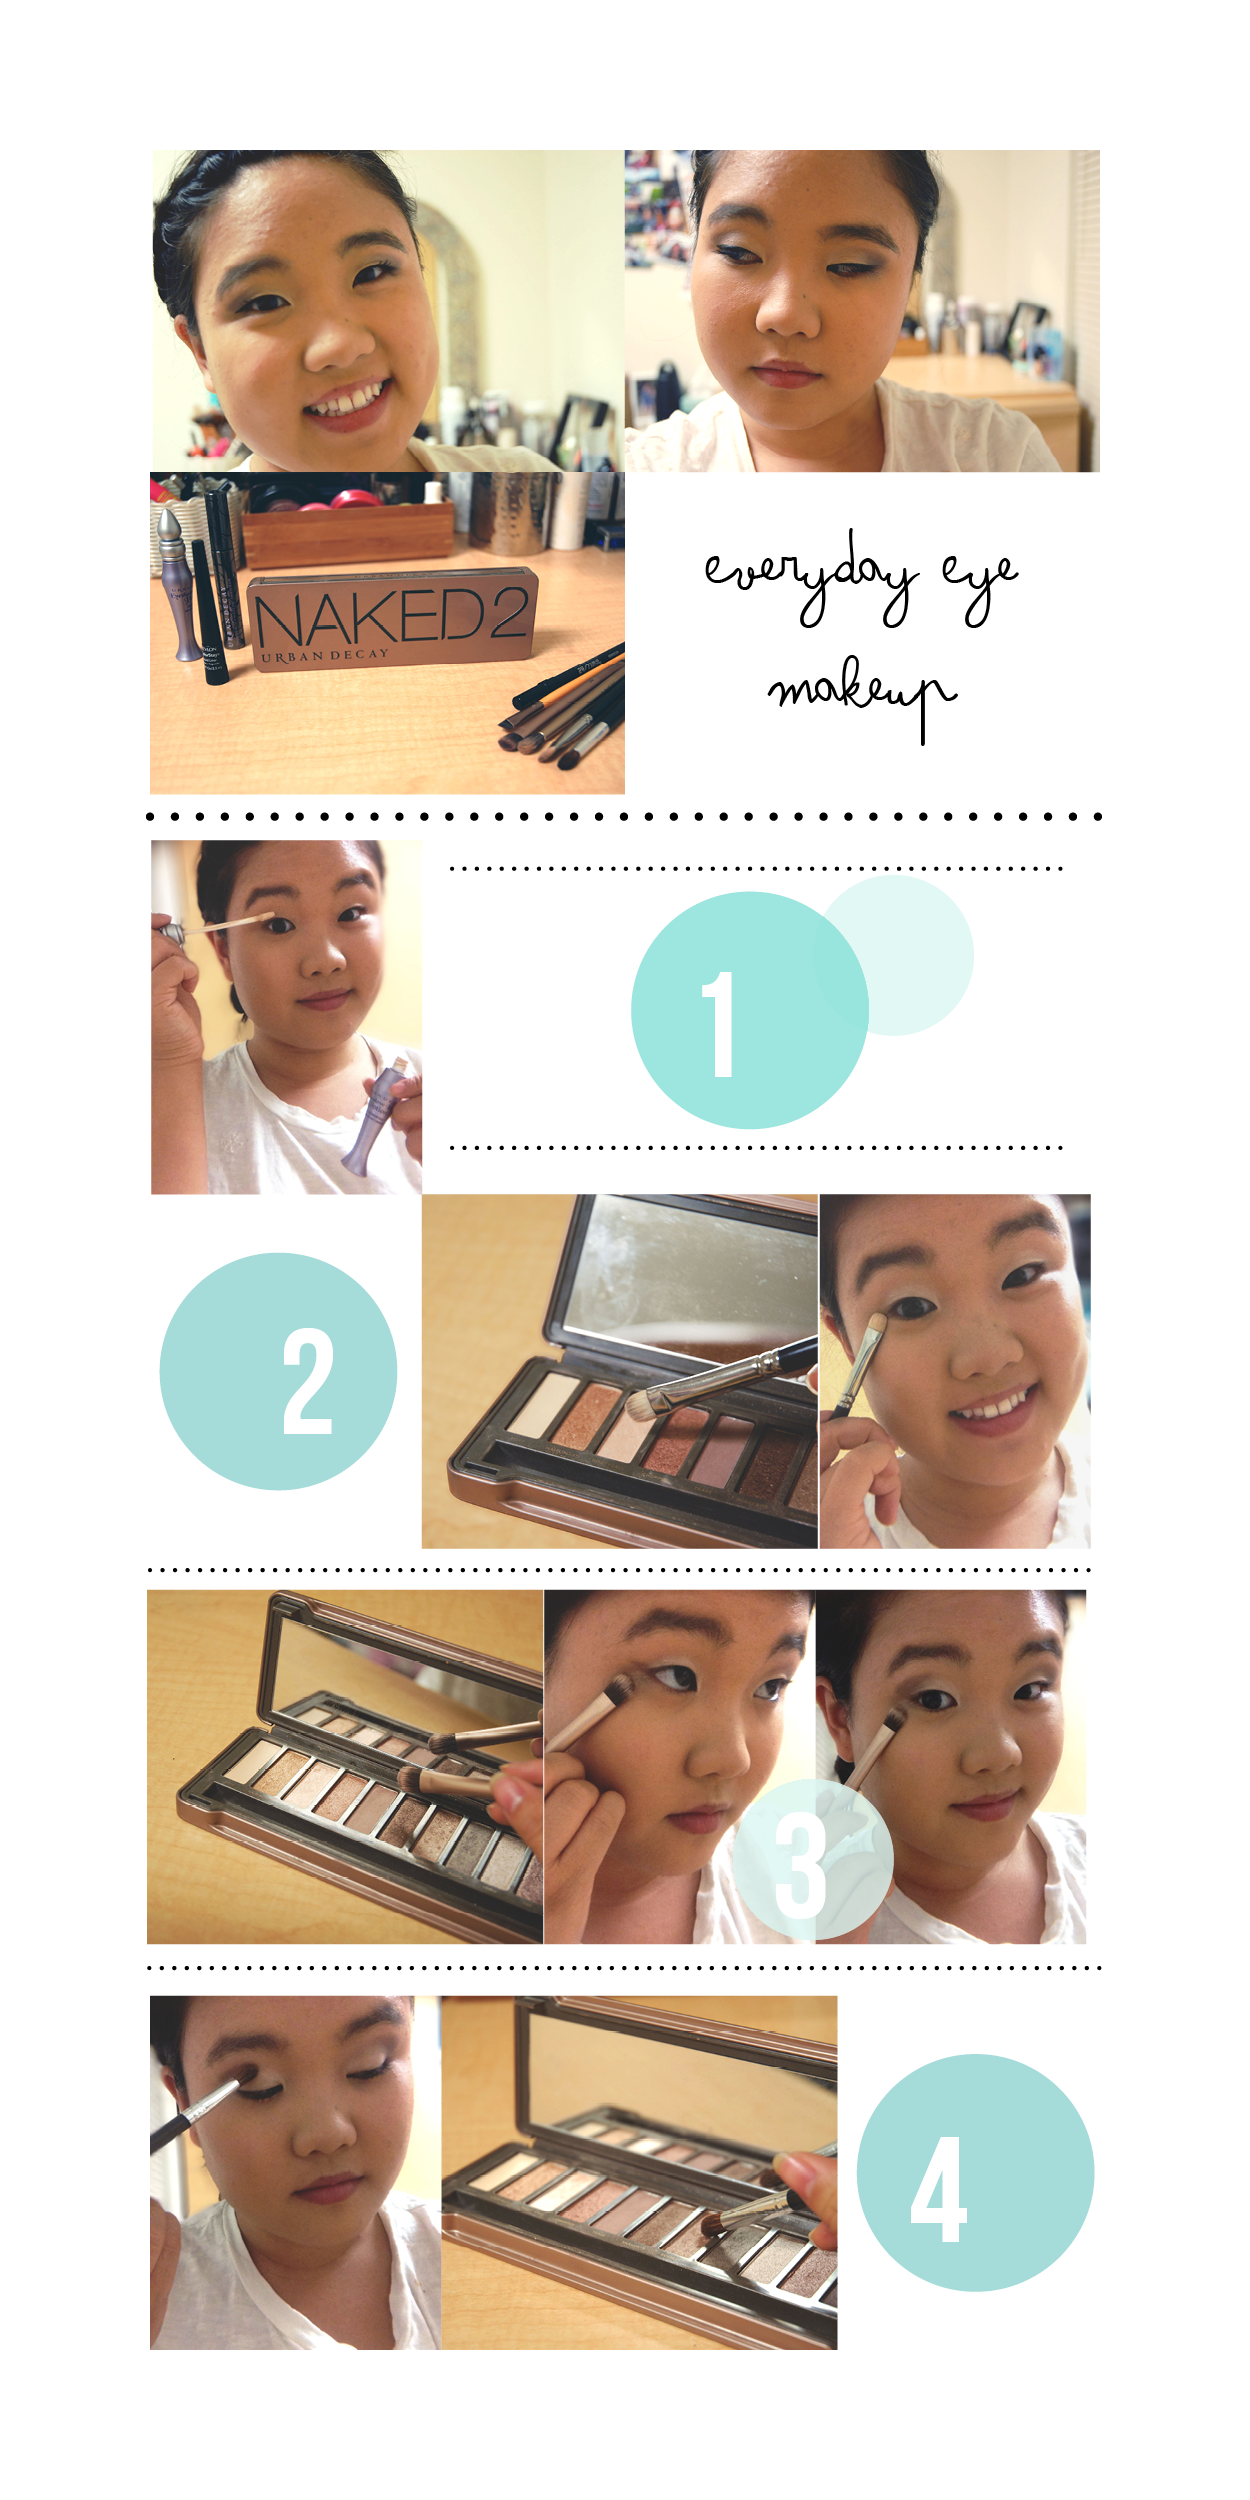
- As every beauty blogger and their mother knows, start by priming the eyelids after applying foundation. I’m using Urban Decay Primer Potion.
- Time to break out that Naked 2 palette! With a flat shader eyeshadow brush (this is a MAC 239), apply an even wash of the light, shimmery, yellow-based champagne shade ‘Bootycall’ to the lid of the eye, keeping the color concentrated under the crease. Use a packing motion to do so.
- Using a fluffy eyeshadow brush (this brush came with the Naked 3 palette), start by drawing a line from the corner of the eye at an angle toward the brow, using the taupe color Tease and stopping at the beginning of the crease. With the leftover pigment that remains on the brush, sweep the color inward, halfway through the crease. Concentrate the color at the outside of the eye, letting the color get gradually lighter as it moves inward. Stop just above the pupil of the eye.
- Pick up a fluffy, blending brush (this is a cheap brush from Target that you can find with the fake lashes. I can’t find a link online) that is not dense. You want a brush that will not deposit a heavy amount of color; the more bristles a brush has, the more color it will pick up. Take some of the “greige” (grey-beige) shadow Suspect and run this on the inner half of the crease, blending from where the taupe ends and over the lid color, creating a seamless transition to harmonize the colors, stopping above where the iris ends.
- With the blending end of the brush that came with this palette, pick up some of the matte, flesh color Foxy, or a color suitable for your skin tone, and use a windshield wiper motion to blend out the edges of the shadow under the brow and at the corner of the eye so that no harsh edges remain.
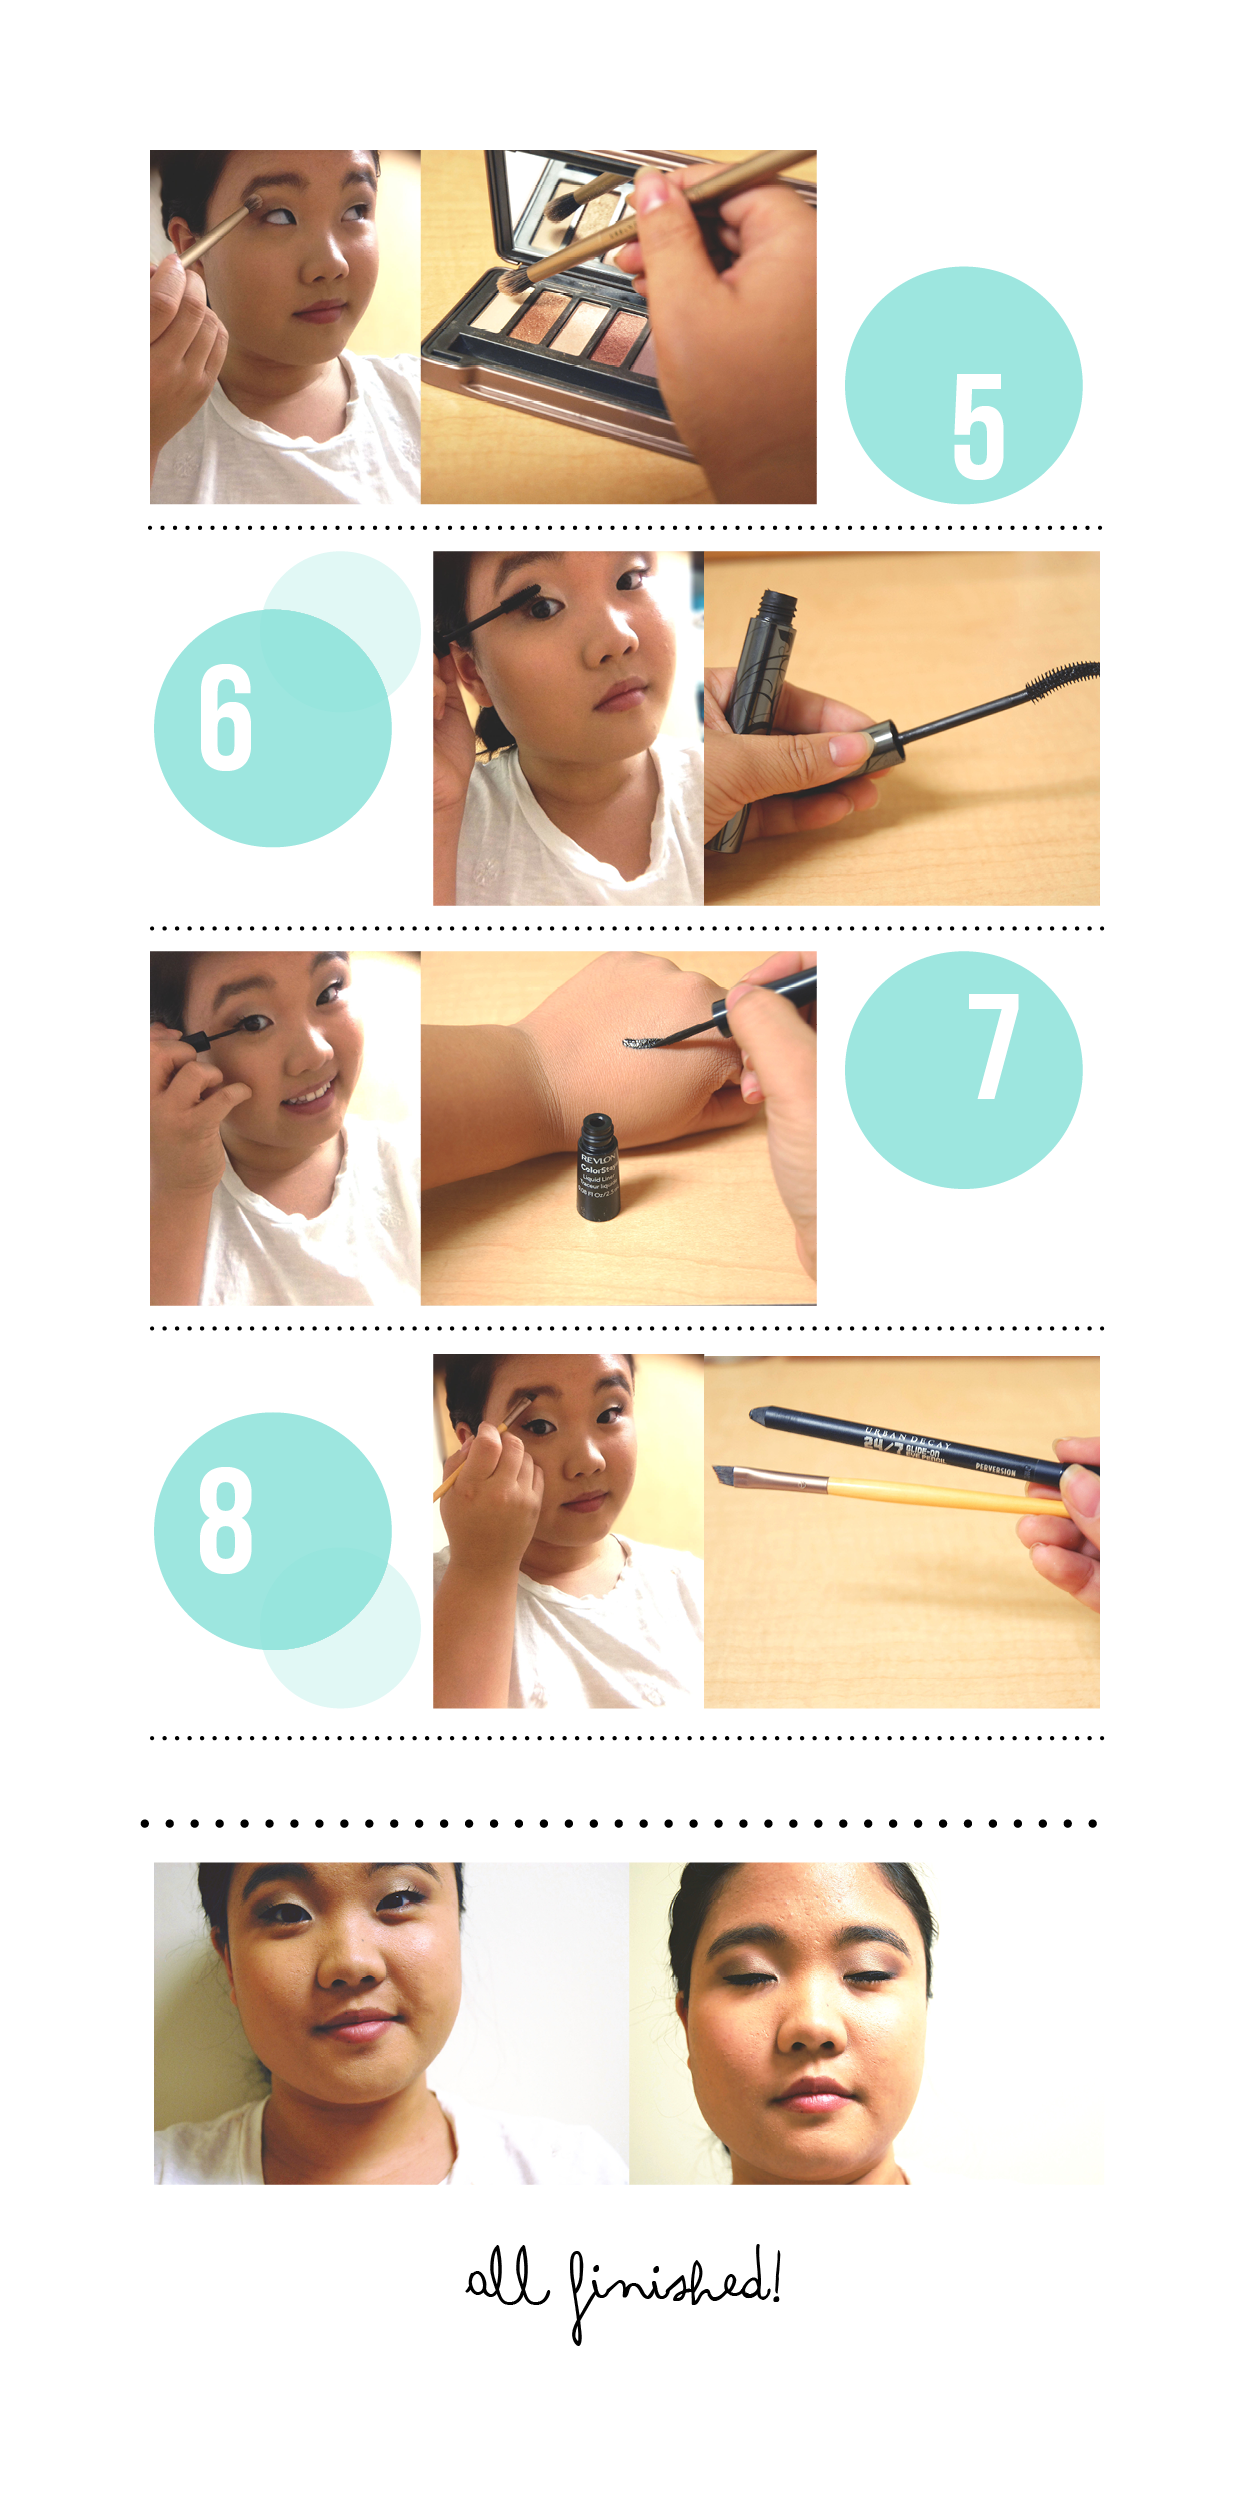
- Apply a good two coats of mascara. I’m using the Supercurl Mascara by Urban Decay which claims to curl lashes with the curved wand, nixing the step of using a lash curler. From my experience, it adds a tiny bit of curl that is enough for everyday, but I would not toss your lash curler in favor of this. I did not curl my lashes for this step, but adapt your own lash routine as necessary.
- Using my Revlon Colorstay liquid eyeliner, I lined my eyes with a thick line that came to a downward facing triangle at the end. This is a line which best suits the shape of my monolid eye, so I would recommend going with a liquid liner routine that works for you.
- Finally, fill in the brows to frame the face and finish the look. I am using a small, angled brush from Ecotools and dipping it in my Urban Decay 24/7 Perversion eyeliner with a light hand to fill in the sparse areas, and shape my arch. I know this isn’t a technical brow product, but having such dark hair I find it difficult to find a suitable color that doesn’t look too brown, gray, or like a Sharpie attacked my face. This solution has worked for me so far but I am still hunting for the perfect product. Comment if you have any recommendations 🙂
Since this is only an eye makeup tutorial, I have ended it here. However, I would finish off with a cool-toned blush and some contouring and highlighting before setting with a finishing powder and spray. If you would like to take it a step further, highlight the inner corners of the eyes and darken the “outer-v” of the crease to punch up the look. These are just my personal preferences, and I encourage you to adapt to whatever you are comfortable with. You’ll also notice that I started with my foundation already done. Comment below if you would like to see my foundation routine for my oily/combination skin. Finally, links to all of the products I used are a list at the bottom of the post.
I hope you enjoyed my first tutorial and I would love any feedback you have regarding this post so please leave a comment! Until next time, have a wonderful (Thanksgiving, for America) week!
All my love,
Megan
*Disclaimer: This is not a sponsored post, although it may seem so since I have used so many Urban Decay items. Like I said at the beginning, I have been a fan of Urban Decay from the beginning, hence my large collection of their products. All items I have purchased myself or have been gifts from friends or family (such items will be marked as such in the list at the bottom) and all opinions are my own.

2 Replies to “Tutorial: Everyday Eye Makeup”