


Happy holiday weekend! As promised, here is the second part of my Holiday look mini-series, if you will. This one is much more glam and sure to turn heads! For this look, I’m doing a modern re-vamp on the classic pairing of red and green. Again, we’re using some new makeup that’s both new to the blog and new to my collection recently.
The base part of the look are the same beginning steps from the previous post, so be sure to check that one out to get started. Other than that, let’s get started on this luxe look.
Look 2: #Slay the Holidays
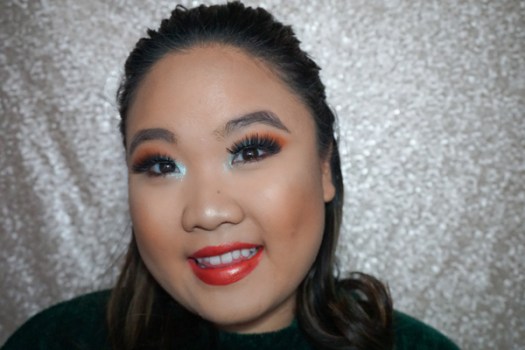
1. Contour & Bake


After the base is finished, apply a strong contour. I used my well-loved Anastasia Contour Kit in Light-Medium (shades Java & Fawn) and a dense, square cheek brush to hollow out my cheeks.
Immediately, I’m baking with a white powder and a beauty sponge (you can use any setting powder you like that suits your skin tone and texture) to help clean up the edges under the contour and to catch any fallout under the eyes from the shadows we’re about to apply.
2. Eyes
For the eye look today I thought I would bust out my coveted Jaclyn Hill x Morphe palette. While this palette has been out for a few months now, and in my collection for even fewer, I’m finally putting it on the blog for the first time today.

A. Crease


To prep the eyes for blending, I’m lightly defining the outer third of the crease with the mustard shade “Creamsicle”. Optional: you can also add a bit of the neutral shade “Silk Cream” (third from left, top row – not labeled above).
Over the top of that blending shade, I’m starting to shape the crease with the matte copper shade “Jacz”.
B. Add Depth & Blend


To start adding depth to the crease, I’m drawing a line of the dark brown shade “Chip” right above the lid with a pencil brush and then blending it upwards. You can also add some more Jacz to help create a seamless transition.
C. Clean Up Lid


In order to make sure that the green looks vibrant, I’m applying concealer over the lid with a small flat brush and blending it out with a teeny tiny Luxie 141 Mini Round Brush to make sure the edges aren’t hard. I also layered a little of the NYX Jumbo Pencil in Milk (not pictured) to make the lid even lighter colored.
D. Lid Color


Over the top of the concealer, I’m applying “Enchanted” – the matte dark teal color – with a small shader brush. If you want to add a bit of dimension and shimmer, I added the Makeup Geek Foiled Shadow in “Houdini” at the outer and inner thirds of the lid space, leaving the middle untouched. In the center of the lid, I’m going back to the Jaclyn Hill palette and applying “Diva” with a wet brush to make it really pop.
*In retrospect, after this step, I would’ve liked to have blended the transition between the crease and lid a bit better, repeating the steps from part B.
My Thoughts:
I’m probably the only person in the beauty community who is neutral on Jaclyn. I neither strongly dislike or am die hard for her, and having her name on the palette doesn’t mean too much to me. The palette itself I find to be gorgeous and the selection of colors are vibrant and beautiful. All of the shadows I’ve used here didn’t cause any problems: no skipping, low pigment, or bad quality whatsoever. I don’t own any other Morphe palettes to compare shadow quality to, though. There isn’t too much fallout either. Overall, I like using my palette to create colorful and/or warm looks. My only complaint is the packaging, as I would’ve liked a mirror, thicker cardboard, and the shade names in the actual palette.
E. Under Eye


For the bottom lash line, I’m applying the Pixi Silky Eye Pencil in Bronze Beam and smudging it out with a bit of “Chip”. You can also blend away the powder under the eyes and cheeks at this point.
My Thoughts:
I received this pencil at GenBeauty a few months ago and am impressed by the quality of these liners. They are very creamy and pigmented and once dry, are hard to smudge! Very comparable to the Urban Decay ones.
F. Blend Edges


To gradiate the crease even more, I’m adding a bit of the CYO Metallic Sweeping Statement Eye Stick in “Small Minds”, to blur the edges of the crease color.
My Thoughts:
When I first opened the tube, the crayon bullet actual fell out of the tube, which was disappointing. It was easy to reinsert though and seems to be staying put. The color payoff is okay, not the most intense. It is more shimmer than metallic, really. Application is smooth, but not the most blendable.
G. Inner Corner
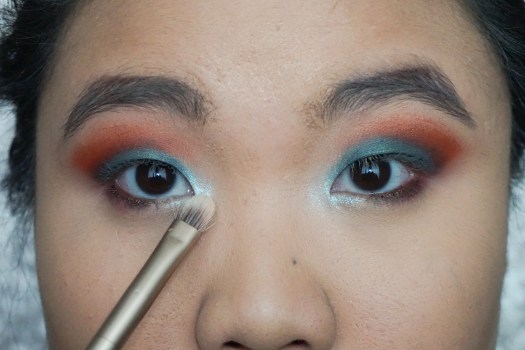
Finally, add a pop of brightness to the tear duct using the pigment MAC Reflects Transparent Teal .
My Thoughts:
I also picked this up while at GenBeauty. I haven’t had a chance to do too much experimenting with this product other than using it as a fun inner corner highlight shade that I’ve been using for days when I do a bolder look like this. However, I find that it looks best when applied with a brush and pressed into the skin. The swatches don’t do it much justice. It is very reflective, but doesn’t quite give the duochrome effect that I was hoping for when I initially purchased. Nonetheless, its gorgeous, easy to apply, and doesn’t need any special adhesives to make it stay in place.
3. Bronze


To add a bit of warmth to the face, I’m using the CYO Cooling Bronzing Stick in Cool As A Coconut and applying it to the temples and forehead, then blending with a sponge.
My Thoughts:
The stick is indeed cooling like the title suggests, but, much like the formula of the contour sticks that I used in the last post, I found that they don’t have much color payoff when blended out.
4. Cheeks


I really want a glow for this look, so I’m using the bronzy peach blush Milani Color Harmony Blush Palette in Bronze Burst and highlighting with “Moonstone” from the Anastasia Beverly Hills Glow Kit in Sun Dipped.
My Thoughts:
Another GenBeauty goodie, the Milani blush has been one of my favorite warm toned blushes since I got it. It applies smoothly and gives a beautiful flush. It does have a slight sheen in the finish, and isn’t completely matte.
5. Lashes


This look commands a bold and luxe lash so I’ve applied the EYLURE Vegas Nay Grand Glamour Lashes and blended them with my real ones using Essence I ♥︎ Extreme Volume Waterproof Mascara.
6. Lips

To finish off the bold look, a bold lip — I’ve applied the CYO Metallic Liquid Lipstick Metalasting Shine in “Dial 911”.
My Thoughts:
This isn’t a traditional liquid lipstick – it’s more of a hybrid lip creme and gloss. It’s opaque like a liquid lip and the formula is pretty similar to others, but it doesn’t ever really dry down. It also has a glossy, subtly metallic finish and isn’t a true metallic in the sense that most of us have come to know it. There is definite transfer and not a super long wear time, but it is very comfortable and easy to apply.
Final Thoughts
The Jaclyn Hill Palette
- Rating: A
- Try it?: Yes! As long as you aren’t against Jaclyn or Morphe, I think it it a great palette for anyone interested in expanding their makeup collection and can be used at any skill level whether you’re a novice or blending queen. It’s very versatile and you can make everyday, colorful, and nighttime looks and it’s at a pretty good price point.
Pixi Silky Eye Pencils
- Rating: A+
- Try it?: Yeah! They are so smooth and have a variety of beautiful finishes. Easily accessible at Target, and a little less expensive than Urban Decay.
MAC Transparent Teal Reflect Pigment
- Rating: A+
- Try it? : Definitely! It’s such a fun color to have in your collection and I can’t wait to experiment. I do hear that NYX has a comparable pigment, but I really like the formula of this one.
Milani Blush – Bronze Beam
- Rating: A
- Try it? : For sure! Milani is known for having amazing blushes and I love this shade in particular.
CYO
Metallic Eye Stick
- Rating: B –
- Try it?: I guess? It’s a mediocre product, does only an okay job and isn’t very outstanding. It isn’t as pigmented as I would hope for, but if you’re a beginner to shimmer in a cream form, this is a good place to start.
Bronzing Stick
- Rating: C
- Try it?: Not sure if it’s my skin tone, texture, or what but I think CYO’s face product formulas are not for me. Try this if you’re light skinned and don’t wear too much makeup.
Metallic Liquid Lipstick
- Rating: B-
- Try it?: Maybe… I think it looks really cool on the lips, but I am not drawn to the formula.

Overall, I love the idea of this look a lot and was able to make it work with the products I had on hand. I think that I would’ve liked to practice it a bit more and maybe swap out a few of the products for something I am more familiar with.

As you can see, though, there is still plenty more products to test out so I think that I will continue this little series with a NYE Edition post in the near future, so stay tuned!


Other than that, I hope that this post finds you well, gives you some holiday inspiration, and that you have an amazing holiday season! Until the next one —
All my love,
Megan
PS: Don’t forget to check out part one: here.
Instagram || Twitter || Facebook || YouTube || Pinterest || Etsy || Bloglovin’
