


Hello, hello and welcome back to the blog! As some of my readers from my personal life may know, my birthday is coming up on Tuesday. With that in mind, I wanted to put together a colorful birthday look that would subtly reflect my personality and tastes while also incorporating a few of my favorite makeup trends to become a sort of summation for this past year of my life and my relationship with makeup. I will preface this with a disclaimer: this is quite a bold makeup look and I’m not quite sure if I’d ever wear this in public, however, if you are daring enough this would be a perfect look for a night out clubbing or a concert. My birthday look for this year is a silver smokey eye with a bold double winged liner, pop of mint, fluttery falsises, and a subtle ombre dark berry lip. So, without further delay, let’s get started! (Ps: I apologize for the ugly dorm background in these pictures, but I didn’t have enough time to shoot with natural light today so that I could get a white background.)

 For time saving purposes, I have already applied my base (primer, foundation, concealer, contour & highlight), groomed my brows, and primed my eyelids to get things going.
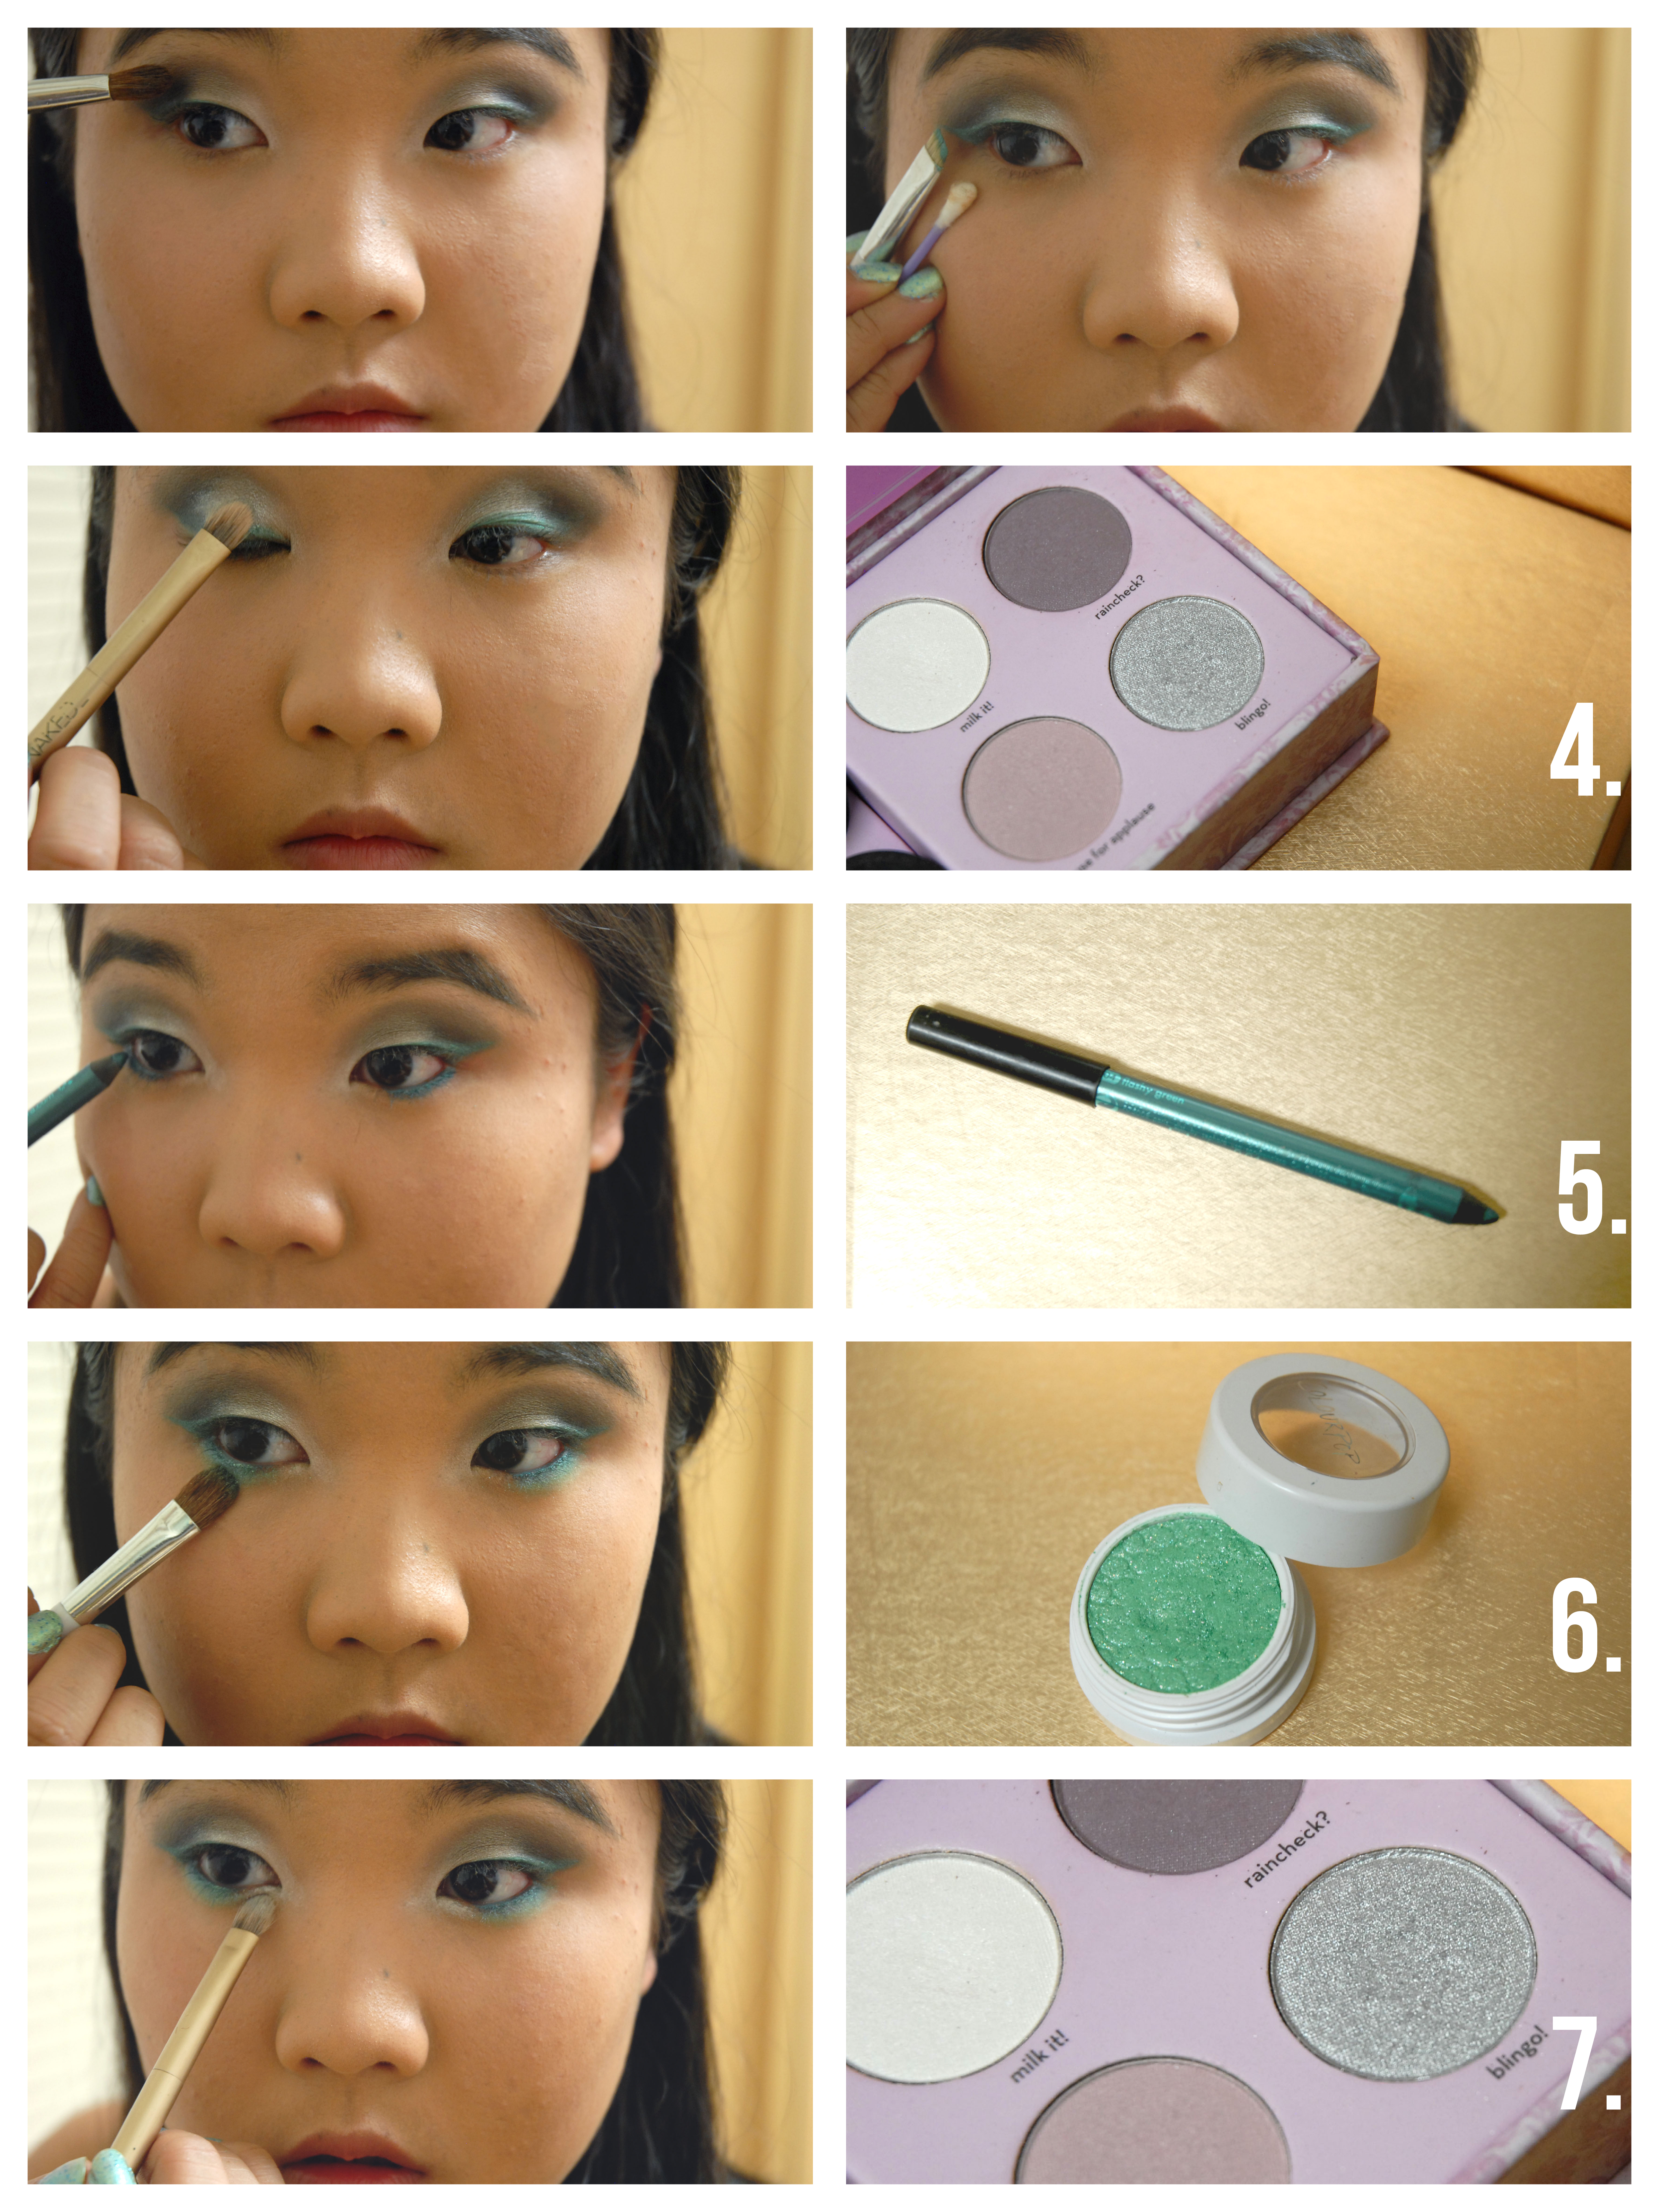
- With an angled eyeliner brush, apply a mint colored gel eyeliner into a large wing shape. For the purposes of this tutorial I just reused this Maybelline Color Tattoo in Edgy Emerald from my Mint and Coral tutorial, which is a cream shadow and not a gel liner so it will need to be set with powder.
- Take a matte, cool toned gray shadow and run it through the outer crease, above the wing of the liner, concentrating it only on the outer third of the eye. Blend out the edge of the gray with a neutral color to prevent harsh lines. I used the colors from the Sonia Kashuk Eye Couture – Eye on Neutral palette.
- Time to break out your Naked 2 palette! Pack the shimmery white silvery color (Verve) all over the middle of the lid of the eye and into the inner corner as a preliminary highlight. Take a fluffy crease brush and the shimmery gunmetal color (Pistol) to blend through the crease, blending from the outer crease and over the lid color. Use windshield wiper motions to create a seamless transition. Using a dense pencil brush, take the matte black shade (Blackout) and very carefully deepen the outer corner. Take the fluffy crease brush again with Pistol and blend out the harshness from the black outer corner and smoke out the crease. Pick up the angle brush again and redefine the wing of the mint liner. Use a cotton bud to clean up any fallout under the wing.

- Take a flat shader brush and with a delicate hand pack a saturated metallicy silver over the lid to intensify the silver. This is blingo! from the Benefit World Famous Neutrals – Sexiest Nudes Ever palette.
- Using a matching pencil eyeliner to the gel liner (this is the Sephora Flashy Green liner), line the bottom waterline and lashline two-thirds of the way in.
- Run a mint colored shadow over the liner to set it in place. This is the Colourpop Cosmetics shadow in Chipper which I used in my Spring Makeup tutorial.
- Mix a shimmery white shadow (milk it! by Benefit) and the metallic silver color (blingo!) to use as a lower lash highlight and place the color in the inner third of the waterline.

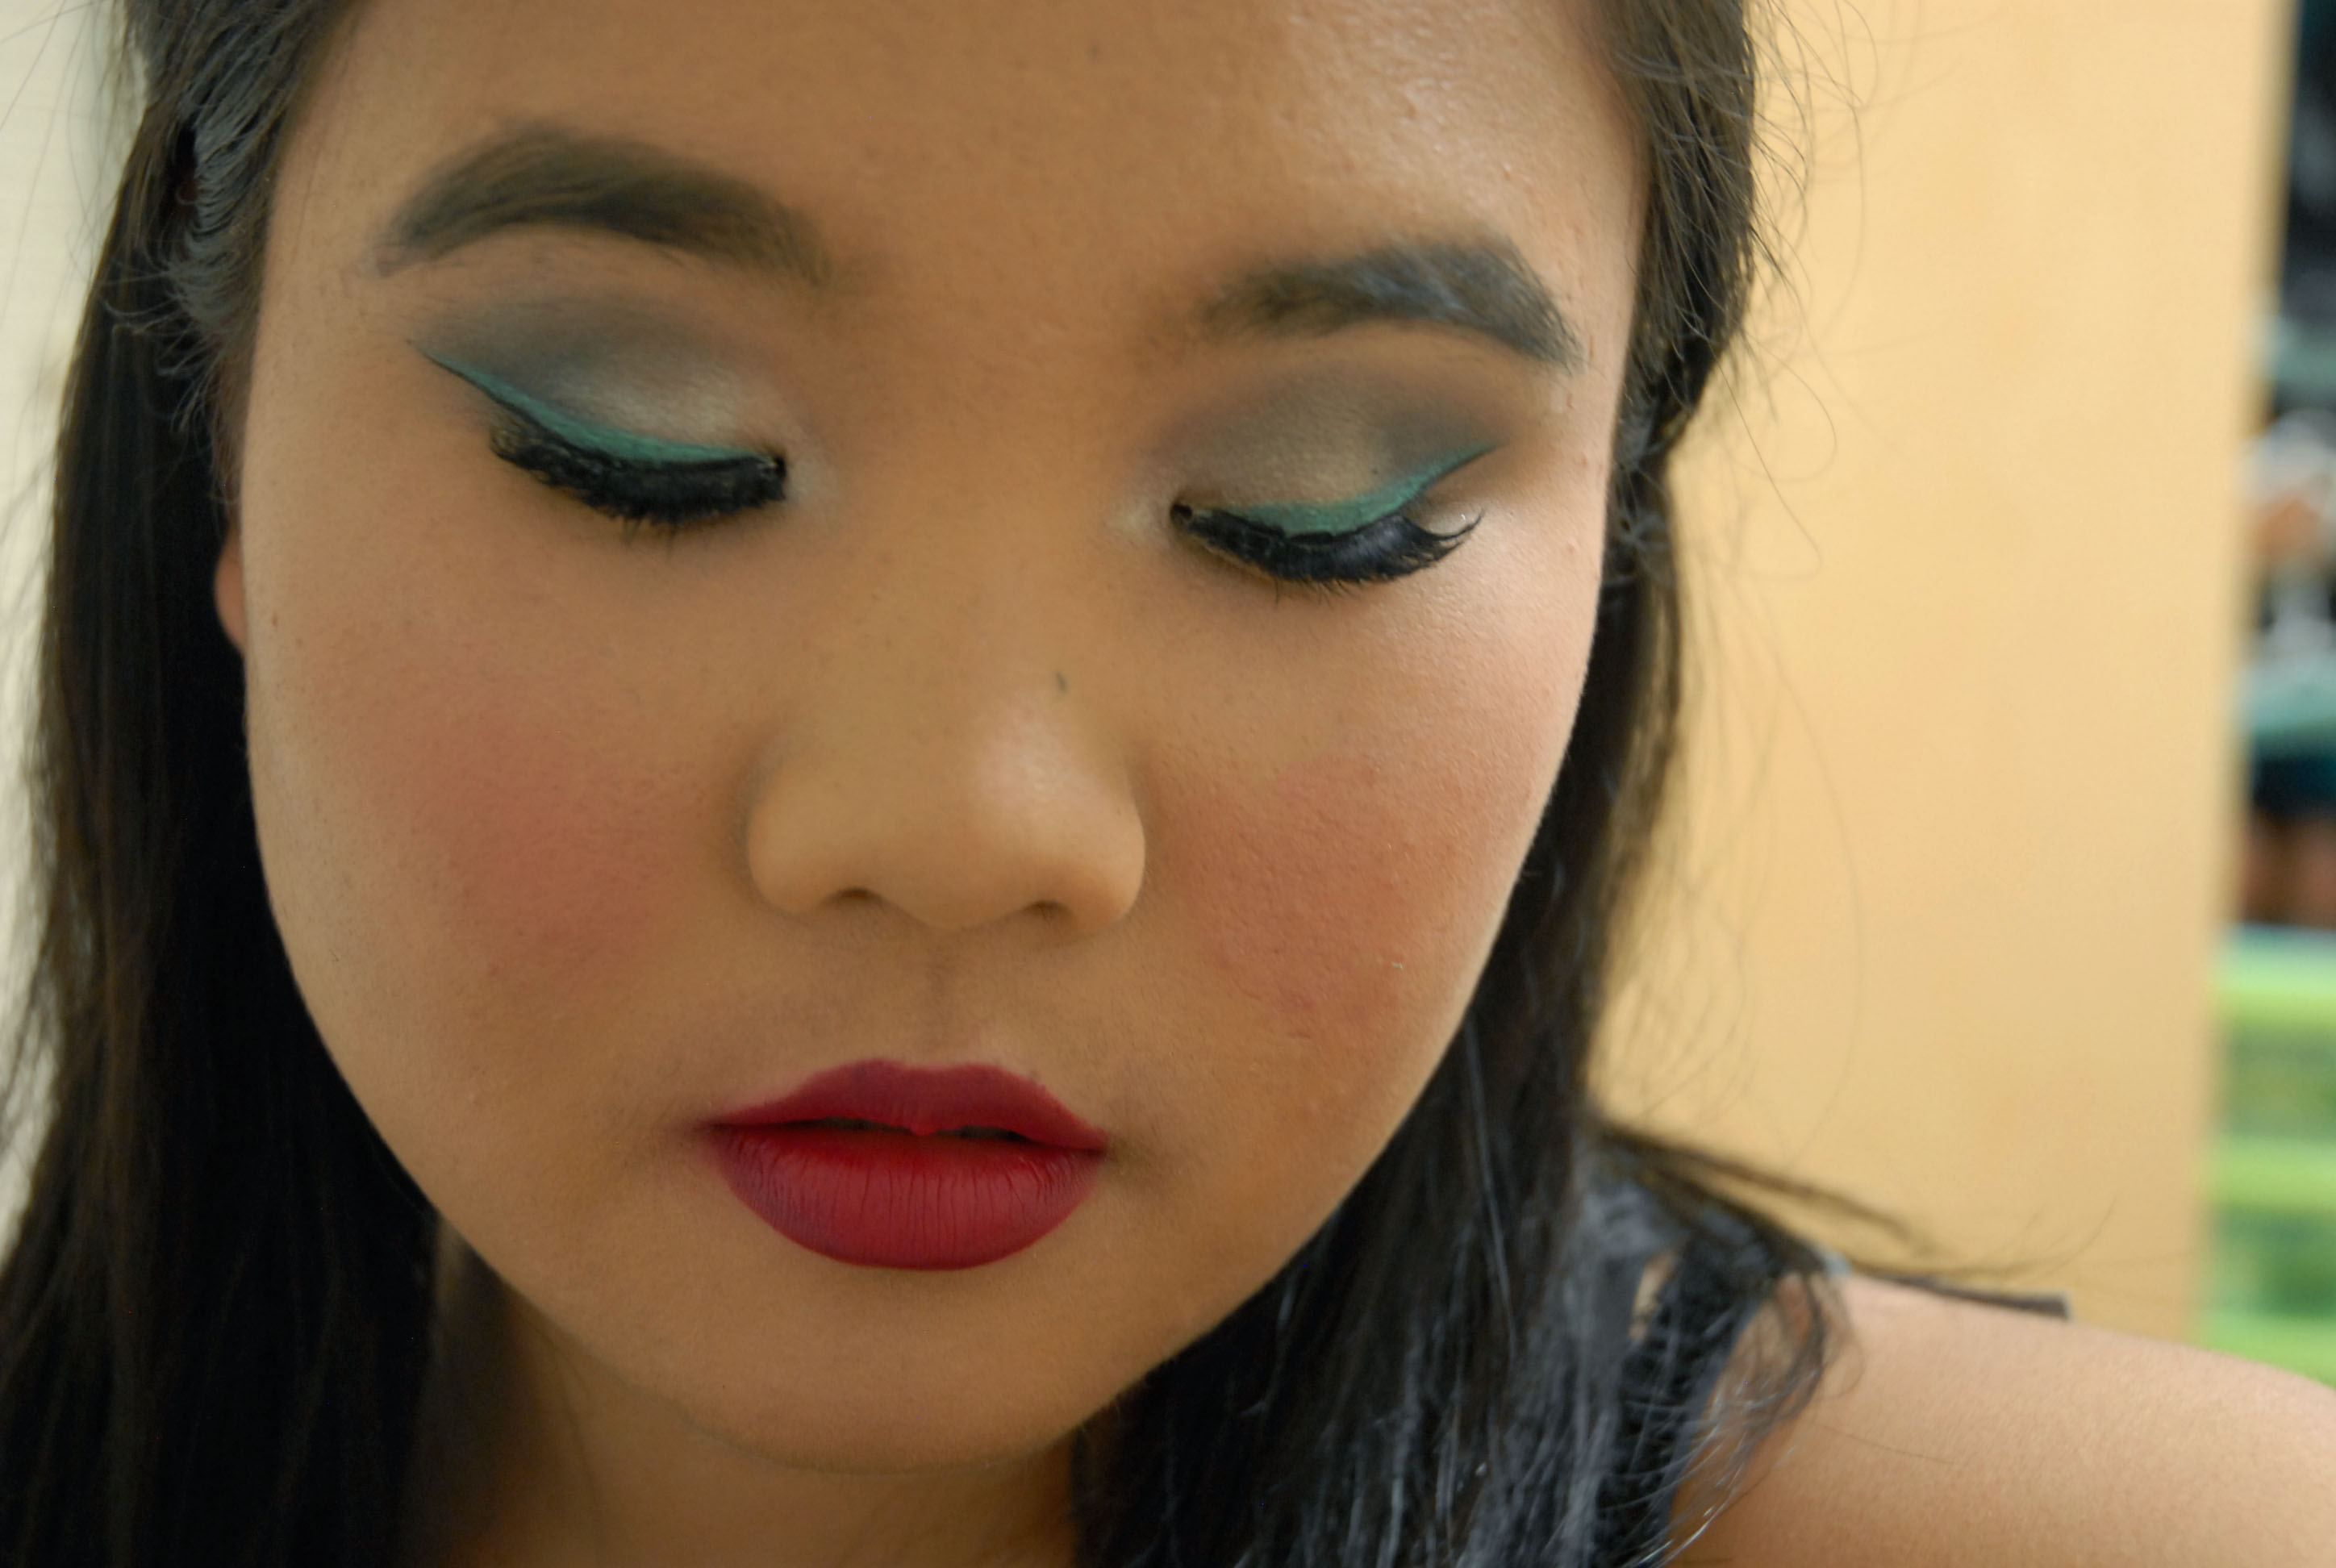
- Not pictured, but at this time curl your lashes and apply mascara as you normally would. Now apply false lashes. These are my first and favorite pair (not my original first, but the same kind as my first). These are the the Cool Kitties by Katy Perry that are sadly discontinued but are very similar to the Feliene Fierces. I use Duo Lash Adhesive to apply these although a small tube of glue does come with the lashes.
- To hide the band of the lashes, apply a thin line of liquid liner over the band and following under the wing of the mint liner to create a double wing. I use my everyday staple, the Revlon Colorstay liquid liner.
- Since my contour and highlight is already applied, I just added a touch of blush to the apples of the cheeks. This is Tarte’s Blushing Bride.
- For the ombre lip, I started with Bite Beauty’s Matte Lip Crayon in Aubergine, a beautiful dark berry shade that I featured in my Berry Lip Products post. Since it is a crayon applicator, it is the perfect shape for making a thick line around the lips. Apply as a liner at first and then begin to fill in the lips until only the middle remains blank.
- Fill in the middle with a slightly lighter matte shade in the same color family. This is the lippiestix I Heart This by Colourpop Cosmetics. Finish off the look with a setting powder and spray.


Bonus: I’m wearing Deborah Lippmann’s Mermaid’s Dream as a Birthday Mani this week, in case you were wondering.

That’s it, you’re finished! I know that this is a quite advanced tutorial, but I wanted this to be a little personal birthday gift to myself and become testament to how far I’ve come on my own journey experimenting with makeup. It has taken roughly eight years of learning and practicing with makeup to get me this far, but I wanted to show what a little bit of passion and dedication can do. Also with the support of my family and friends who have been nothing but encouraging over my obsession, I have made it here. So, I thank you all for another year of your love and encouragement. I can’t wait to see where this next year of my life takes me. I hope you enjoyed this tutorial and if you’re daring enough to recreate this look please tag me using my social media links down below!
All my love,
Megan
—
Instagram || Twitter || Google+ || Pinterest || Bloglovin’

5 Replies to “Tutorial: Megan’s Birthday Makeup”