


Hey, all! Welcome back. This week marks the last installment of The Basics Series, but don’t fret because part 2 will promptly be on it’s way! I’m not sure how large of a gap I’ll leave between these segments, but it won’t be more than a month, I promise. Anyhow, here is the grand finale- my recommendations for starting and growing your makeup collection. I put together a three part piece, almost like a mini version of my lookbooks, each with a specific demographic and budget in mind. Since these are beginner tutorials, these consist of primarily drugstore recommendations. I designed this so that you can build upon it as your collection grows. I know that doesn’t make much sense now but you’ll get the picture as you keep reading, so let’s get started! (Ps: Keep in mind that these are just my recommendations, so take them as you will and adapt accordingly.)
The Bare Necessities
This first part is exactly what it sounds like- the utmost bare necessities. These are the absolute minimal amount of products I would recommend so that you can create a full face. Not everyone necessarily needs this much makeup, nor am I saying that anything more is excessive, but if you are an absolute noob and need a good place to start, I would recommend here. This is a good starting point if you have absolutely no makeup to begin with or if you are just starting to wear makeup for the first time in middle school. This handful of products will cost about $25-$35. There are no tools, for this no fuss everyday face.
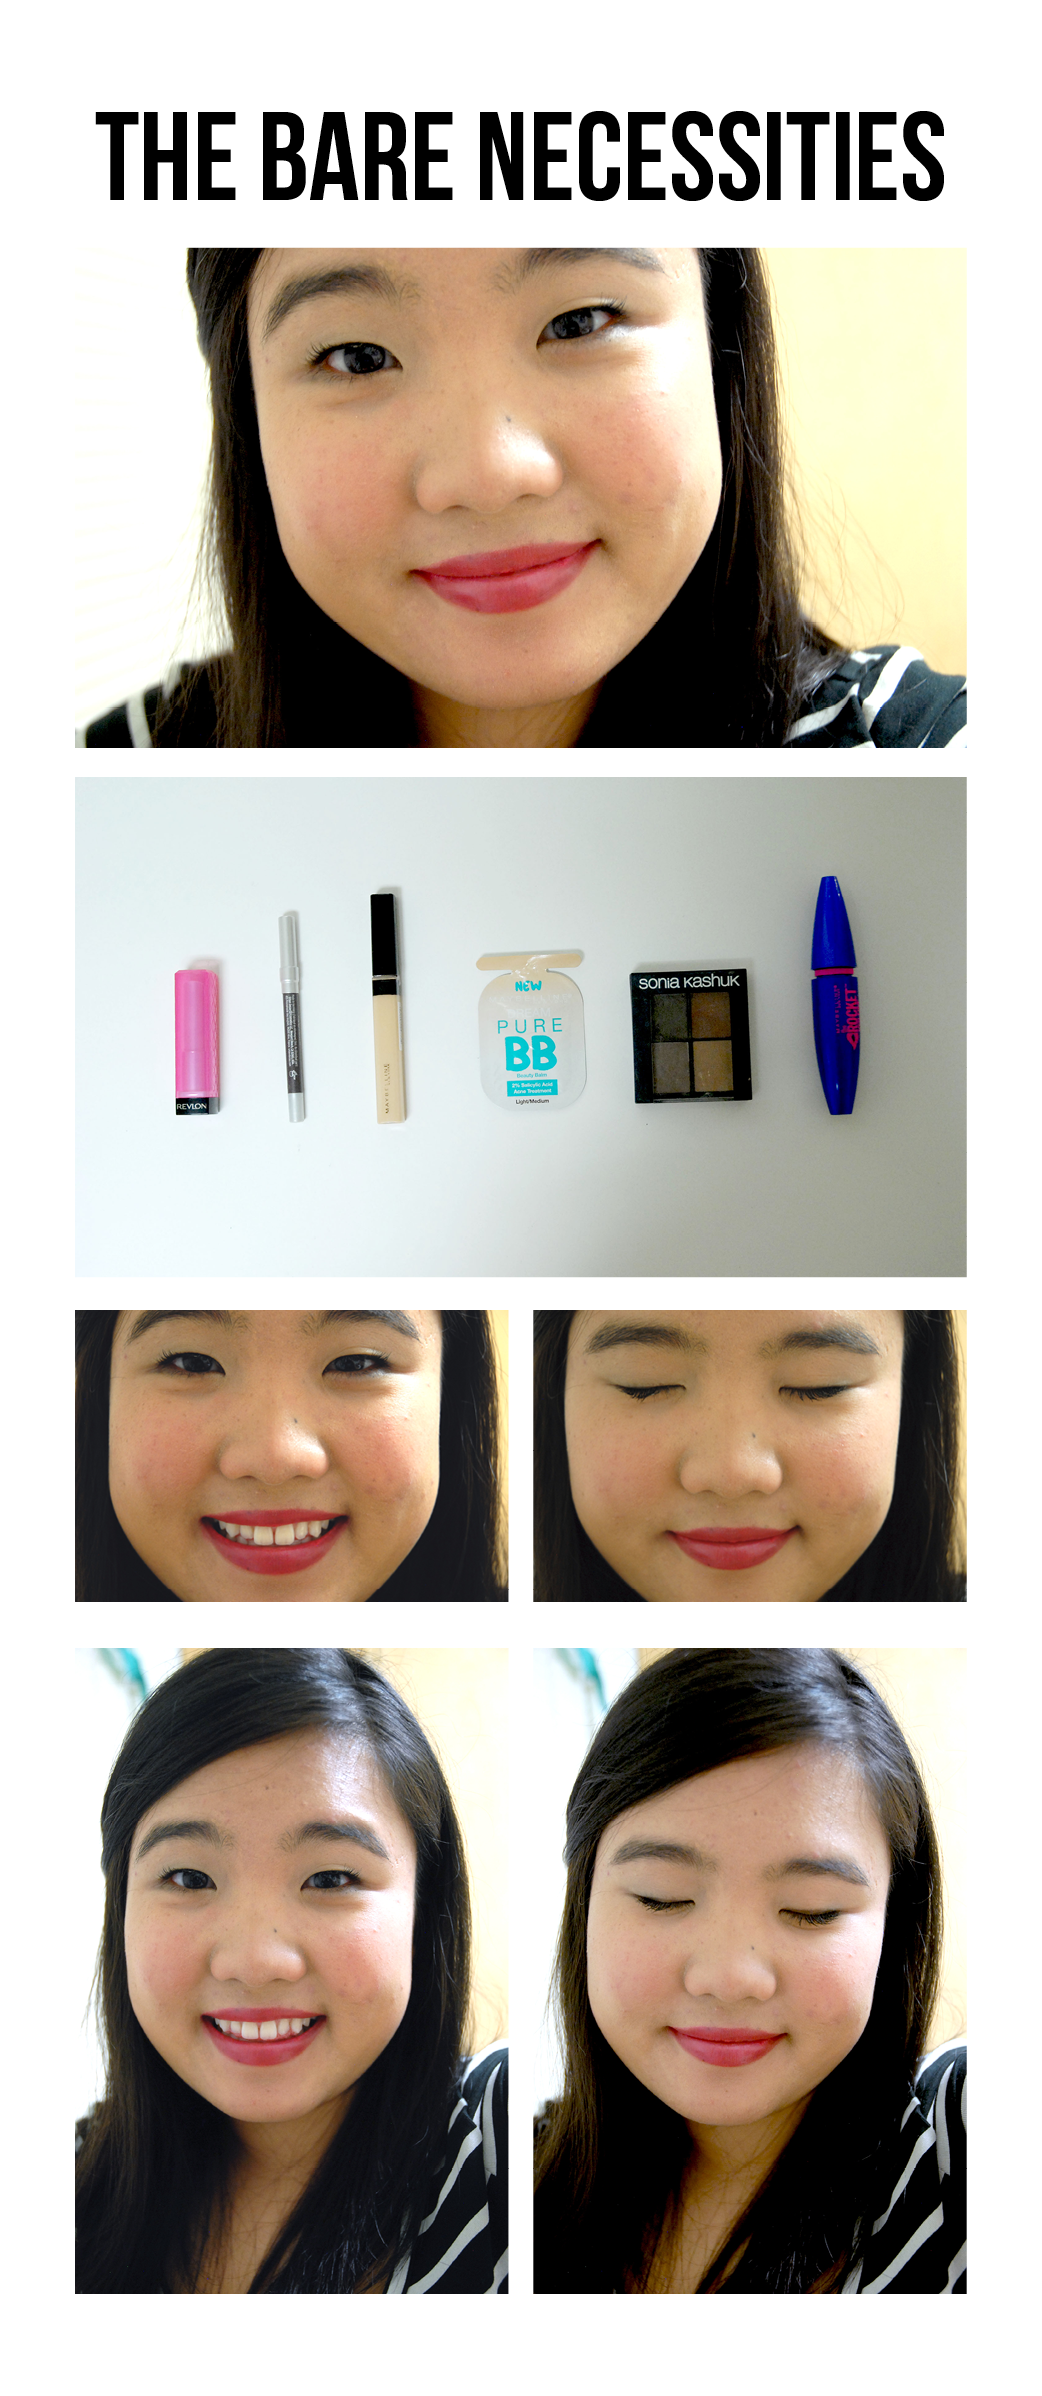
The Products:
- A dual purpose cheek and lip product- Revlon Colorburst Lip butter in Sorbet (used)
- Brown pencil eyeliner- Rimmel ScandalEyes in Brown (recommendation) Urban Decay 24/7 pencil in Demolition (used)
- A liquid concealer- Maybelline Fit Me (used)
- Brow product- Maybelline Eyestudio Brow Drama Sculpting Brow Mascara (recommendation) Sonia Kashuk Arch Alert Brow Palette (used)
- Mascara- Maybelliene The Rocket Mascara (used)
Extra Add Ons:
- BB cream- Maybelliene BB Cream Skin Clearing Perfector (used)
- Mattifying powder- Rimmel Stay Matte Powder (recommendation)
- Powder brush- EcoTools Large Powder Brush (recommendation)
The Face:
- Starting with a clean face, apply concealer over blemishes using a clean finger. If you have darkness under your eyes, apply some of the concealer under the eyes in a triangle shape. I recommend a liquid concealer because it can be used on both blemishes and mild undereye circles. If you are concerned that a concealer is not enough coverage, try a BB cream in addition. I have a good amount of acne scarring so I opted for this choice. If you also suffer from oily skin, try adding a mattifying powder. If you want additional coverage to just your concealer or to the BB cream as well, use a colored powder but if you just need to mattify, use a translucent formula. You can see that this still provides a pretty fair amount of coverage, although there you can still see a bit of discoloration in my skin, however it looks pretty natural. Learn more about face products here.
- Apply a good coat of mascara. I used the blackest black version, however if you have especially light features or are intimidated, you can use the regular black version, or even the brown color.
- Draw a thin line of brown liner across the top lashline just to add a bit of definition.
- Fill in the natural shape of your brows. I would recommend using a tinted brow gel, as it is the most simple option and does not involve any excess tools. However, I used my standby Sonia Kashuk brow wax, which is a good option for those of you with dark brows like me.
- Swipe the top of your lip color using your clean pointer and middle finger, then dab the color over the apple of the cheeks. Then, apply the color over the lips. I chose this Sorbet color as it is fairly pigmented, but still quite sheer and light on the lips. It is also a fairly neutral shade of pink, and not too warm or cool toned.
The Basics:
The Basics are an extension of the Bare Necessities. The previous products plus these will round out a small collection nicely. You can create a good handful of simple looks with these few products that are suitable for most occasions. In particular I was able to put together a day to night look. This amount of makeup will put you out about $45. This is a good amount for someone who wears a bit of makeup everyday and wants to diversify a bit. This was about the same amount of makeup I had in the beginning of high school and I would recommend this amount for those who are the same age. This stage is a good time to pick up some simple tools and add a few key products .
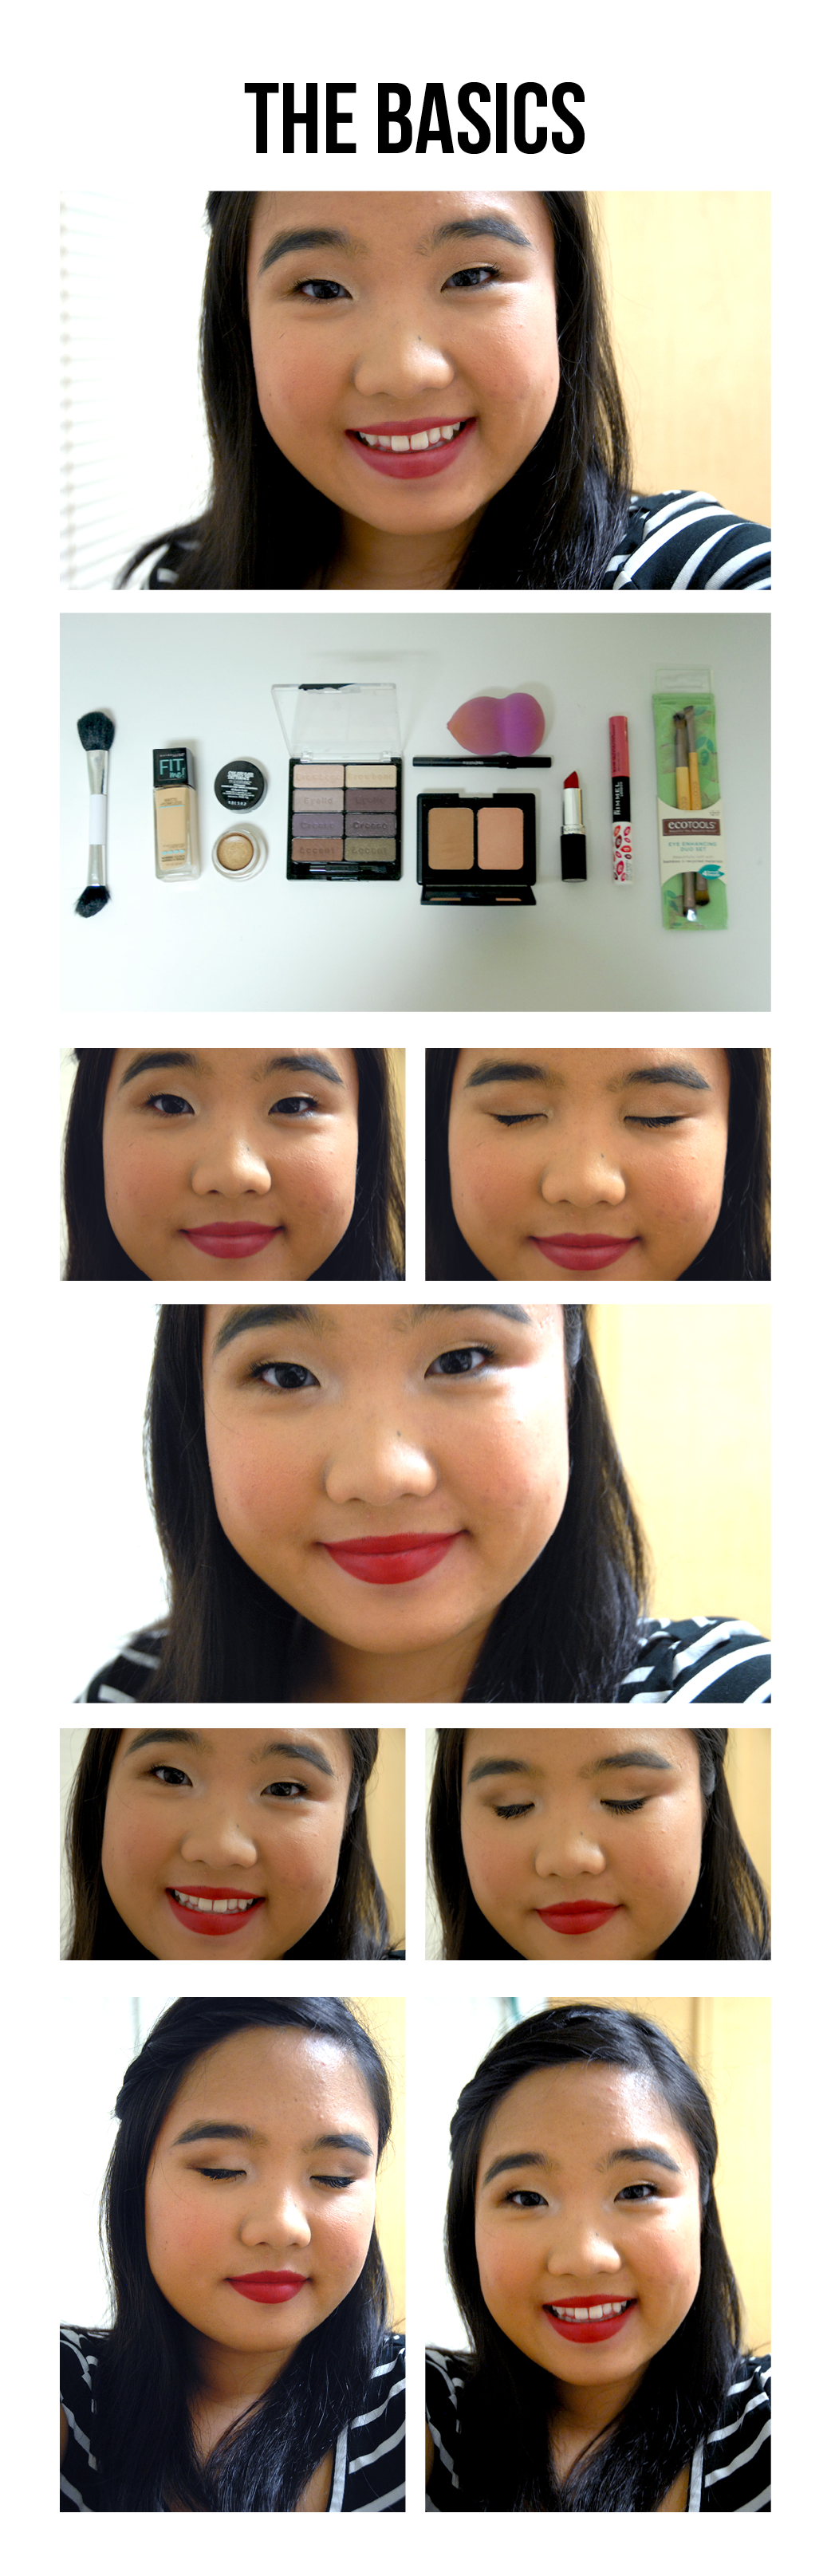
The Products:
- Light foundation- Maybelline Fit Me Matte (used)
- Neutral cream shadow base- Maybelline Color Tattoo in Bold Gold (used)
- Neutral eyeshadow palette- Wet n Wild Walking on Eggshells trio (recommendation), Wet n Wild Downtown Browns (used)
- Blush & bronzer duo- Elf Contouring Blush & Bronzing Powder (used)
- Black pencil eyeliner- Pixi Endless Silky Eye Pen (recommendation) Urban Decay 24/7 pencil in Perversion (used)
- Red lipstick- Covergirl Colorlicious Lipstick in Hot (recommendation)
- Neutral lip color- Rimmel Provocolips Lip Color in I’ll Call You (used)
- Makeup blending sponge- Precision Blending Sponge (used)
- Dual ended eyeshadow brush duo- EcoTools Eye Enhancing Duo Set (used)
- Dual ended face brush- Sonia Kashuk (used)
The Face (Day):
- Dampen the blending sponge and use it to apply the lightweight foundation. A lightweight foundation has a medium amount of coverage and lasts throughout a workday. This particular formula has both a dewy and matte version, so that you can choose what version you need. Apply concealer if you desire additional coverage.
- Use a clean finger to apply the cream shadow over the lid of the eye. This acts as a base for the eyeshadow. Set the cream with the lightest shadow highlight shade. If you are interested in expanding your eye looks, opt for the larger palette, but if you prefer something more simple, go with the trio. Using the blending end of the eyeshadow brush (see my brush guide if you don’t know which end it is) buff the medium lid color through the crease (trio) or you can use the bronzer shade from the cheek duo.
- Apply a few coats of mascara and smudge a little bit of brown eyeliner across the top lashline. Fill in the brows with a bit of a heavier hand to add a bit more definition.
- Use the angle side of the brush (this is from a limited edition Sonia Kashuk collection, but the linked set is similar. You can also try Elf brushes) to apply bronzer to the hollows of the cheeks and temples. Use the fluffy side to circle the blush over the apples of the cheeks. The glitter in the blush will serve as a highlighter as well.
- Apply the neutral lip color for the daytime. I love this formula since it is longwearing and the perfect not too warm or cool pink tone.
The Face (Night):
- Start with the daytime face.
- Deepen the outer corner of the eye with the dark brown shadow. Deepen the color of the lashline with the black liner.
- Touch up the brows and apply the red lipstick for a night out and perfect classic look.
The Beginner
This stage also includes all the previous products and is the perfect collection for those who are beginning to collect! If you are looking to expand into a bit more quality makeup or beginning to start collecting makeup, this is the right amount of makeup for you! This is about the amount of makeup I had going into college and is a good amount for those around the same demographic. This amount of makeup is much pricer, at about $100, but it will get you some beauty enthusiast favorites and more sophisticated tools of the trade. In addition, it will give you much more variety in looks that you can achieve.

The Products:
- A quality neutral palette- Lorac Pro Palette (recommendation) Naked 2 Palette (used)
- Face primer- Smashbox Photofinish (used)
- Longwear foundation- Revlon ColorStay (used)
- Blush palette- Elf blush palette in dark (used)
- Multipurpose wax pencil- NYX Wonderpencil (used)
- Unique lip color- Colourpop Lippie Stix in I Heart This (used)
- Highlighting concealer-Maybelline Dream Lumi Touch (used)
- Black liquid eyeliner- Revlon ColorStay (used)
- Eye primer- Urban Decay Primer Potion (used)
- Setting spray- L’Oreal Pro-Spray & Set Makeup Extender Setting Spray (recommendation) Urban Decay De-slick (used)
- Setting powder- Tarte Smooth Operator Amazonian Clay Finishing Powder (used)
- Eyelash curler- Tarte (used)
- Brush set- Real Techniques Core Collection (used)
The Face:
- Apply the face primer with clean fingers then apply the foundation with either a blending sponge or face brush.
- Prime the eyelids with the eyeshadow primer. The eyeshadow look is similar to the makeup I did in my first ever Everday Eye Tutorial, so if you would like to learn the steps, click here. Apply a few coats of mascara and curl the lashes. Line the eyes with the liquid liner and try making a flick shape. Now is a good time to experiment with different shapes of eyeshadow and eyeliner, which is an easy way to add variety to your looks using the products you already own.
- Try your hand at contouring and experiment with a different blush shade. Try working with different color schemes, and identifying colors as cool or warm. Pairing like toned colors will help bring cohesiveness to your looks. Highlight under the eye using the highlighting concealer by applying it in a triangle shape beneath the eyes.
- Go for a bold and trendy color for the lips. Lip options is another easy way to expand your makeup horizons for little cost.
- Finish the look with powder and finishing spray to lock your makeup in place all day.
Quicktips for expanding your collection:
- At this point, you have almost one of every makeup product. Find out which ones you like the best, and start collecting different variations of that product.
- Try picking up a few palettes for cheek, contouring, highlighting powders, etc. By experimenting with palettes you usually can experiment with several different formulations and options. You also usually end up getting more bang for your buck than buying these items individually.
- If you are unsure about a product, especially high end ones, look for samples or mini sizes of the product to test them out first.
Alrighty, I know this isn’t my most in-depth written post, but due to the long weekend, I wanted to focus on spending more time with my family. I hope that you found this post helpful for those of you starting in makeup. If you have any questions, leave me a comment below!
All my love,
Megan
—
Instagram || Twitter || Google+ || Pinterest || Bloglovin’

2 Replies to “The Basics Series: Beginner Makeup Kit”