


Hello, everyone and Happy May! I’m sorry about missing another Wishlist Wednesday, but I’ve had a huge project in the works as of late, which I am finally ready to reveal to you. For May, I will be having a month long series featuring just the basics. This is my very first consecutive series on the blog! I decided to focus just on the basics since I realized that a lot of my readers need a good foundation before they can attempt any of my tutorials, which tend to be more advanced. There is some amount of vernacular and technique involved in the makeup, like any niche, that must be understood in order to create or recreate any sort of makeup look. The basics are fundamental and I wanted create a good platform for my readers so that they can achieve any makeup look they choose to. I wouldn’t be a good teacher if I didn’t give you all the skills you need to succeed. (Please note, however, I am not a trained cosmetologist or professional, but I do have a large gamut of experience and knowledge, and have done plenty of research on this subject.) I don’t want to exclude myself to just the beauty community but I want to be accessible to a large audience, including those who maybe aren’t as passionate about makeup as I am, or those who maybe don’t know where to get started. These are the very basic of the basics that I will show you this month. If this series pans out well, I plan to do a part two of this basics series later this summer so that I can cover all the elements of makeup. This week, we’re focusing on everything about eyes. I have broken it down into five basic categories below, so let’s get started!
Note: Pictures in the first two charts are not mine and copyright is credited to original photographers, however the edits are my original designs. The last three charts are my original illustrations and designs.
Eye Brushes
Eyeshadow brushes are the tools you need to create any eye makeup look, because let’s face it, those dinky little foam applicators that often come with eyeshadow aren’t helping anyone. I have compiled a guide below to give a simple breakdown of the brushes that are available on the market, however I am not endorsing that you need every single type of these brushes in your collection, especially for a beginner. The guide is simply to inform you of what is available to purchase. Below the guide, you’ll find descriptions of the brushes, what each can be specifically used for, and popular brushes in that specific category, so keep reading to master Eye Makeup Brushes 101.
Quicktips:
- Popular Affordable Brands:
- Real Techniques
- Makeup Geek
- Morphe
- Eco Tools
- Popular High End Brands:
- MAC
- Sigma
- Sephora
- Zooeva
- The most essential brushes for any beginner collection
- Fluffy Shadow Brush- This brush is multipurpose as the flat part can be used for packing shadow to the lid and the rounded edge is fluffy to do some subtle blending.
- Pencil Brush- Can double as a crease brush and a detail brush.
- Stiff Dome Blending Brush- Can blend out harsh edges and transition colors seamlessly.
- Angled Liner Brush- Can be used to line the eyes or waterlines or fill in the brows.

- Fluffy Shadow Brush
- Description- A fluffy brush with a semi-circle shaped tip and rounded edge that is the same medium density throughout. It is one of the most basic eye brushes for applying shadow, and is widely available from numerous brands.
- Primary Use- This brush is primarily used for applying a quick wash of color all over the lid of the eye using a sweeping or patting motion. The fluffiness of the brush allows for the color to be diffused and blended evenly. It will not pack on a concentrated amount of color, though.
- Popular Makes- Real Techniques Shader (pictured), Sonia Kashuk, Sephora, MAC
- Flat Shader Brush
- Description- A densely packed flat brush with a similar rounded edge, however is much less fluffy.
- Primary Use- Applies eyeshadow in a concentrated amount on the lid. Used in a patting motion to build up a heavy wash of color.
- Popular Makes- MAC 239 (pictured)
- Angled Shadow Brush
- Description- A fluffy brush, similar to the fluffy shadow brush but with an angled and defined edge.
- Primary Use- A multipurpose brush that can be used to blend or apply shadow to the crease of the eye using a sweeping motion.
- Popular Makes- Bobbi Brown Angle Eye Shadow Brush (pictured)
- Smudge Shadow Brush
- Description- Similar to the fluffy shadow brush, but with shorter, stiffer, and denser bristles.
- Primary Use- Use to smudge out eyeshadow or eyeliner to create a smokey effect by running along the edge of the color, back and forth, to diffuse it.
- Popular Makes- Sephora Pro Smudge Brush 11 (pictured)
- Crease Brush
- Description- A densely bristled cylindrical shaped brush with a rounded off edge.
- Primary Use- To buff in circle motions in a concentrated “v” shape at the outer corner to deepen the color and add dimension within the crease.
- Popular Make- Sonia Kashuk Crease Shadow Brush 8 (pictured), Makeup Geek Outer V Brush
- Pencil Brush
- Description- Also a dense cylindrical brush, but with a tapered and pointed end.
- Primary Use- For precision when adding dimension to the crease or to precisely smudge along the water line.
- Popular Makes- Makeup Geek Pencil Brush, MAC 219
- Soft Dome Blending Brush
- Description- A fluffy brush which tapers and fans out in a reverse conical shape.
- Primary Use- For all general blending purposes, but primarily for running through the crease to apply a transition color or soften some edges using a buffing motion.
- Popular Makes- Sigma E35 Blending Brush (pictured), MAC 224, Makeup Geek Soft Dome Brush
- Stiff Dome Blending Brush
- Description- Another reverse conical shape, but with more densely packed bristles.
- Primary Use- To blend out harsh edges from washes of color put on the the lid or crease and transition colors using a windshield wiper motion.
- Popular Makes- Morphe G17 Round Blending Brush (pictured), MAC 217, Urban Decay Crease Brush
- Angled Liner Brush
- Description- A flat brush with a precisely angled edge.
- Primary Use- A multipurpose liner brush that can be used to line the lash line with both wet and dry formulas. Can also be used to fill in eyebrows with a pomade or wax product or tightline the waterline.
- Popular Makes- Eco Tools Angled Liner Brush (pictured), MAC 266
- Flat Liner Brush
- Description- A flat rectangular brush with an even edge.
- Primary Use- To smudge a gel or powder along the lower lash line.
- Popular Makes- Sigma E15 Flat Shader Brush (pictured), Morphe G28 Flat Definer
- Bent Liner Brush
- Description- A miniature conical shaped brush where the ferrel of the brush is bent to offer a more ergonmic shape.
- Primary Use- Best used to apply gel eyeliner with ease.
- Popular Makes- Makeup Geek Bent Liner Brush
- Detailed Liner Brush
- Description- Also a fine tipped conical brush but with out the bend.
- Primary Use- To apply eyeliner or add detail to an intricate look
- Popular Makes- Sephora Classic Precision Liner Brush #92
Eyeshadow Formulas
The formula of the eyeshadow refers to the consistency in which the shadow comes in. There are only a handful of different types of formulas, but here is a comprehensive guide to break it down for you.
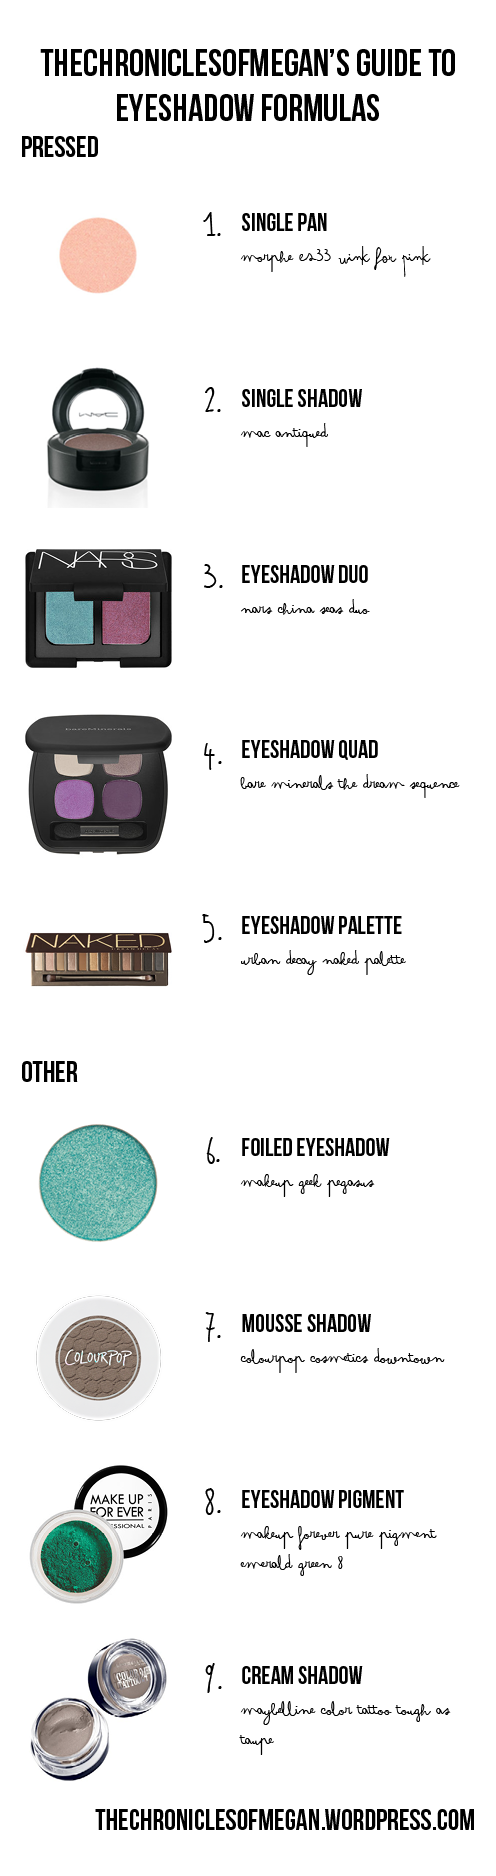
- Pressed Shadows
- Description- Eyeshadow in the most traditional “cake” form where pigment is pressed into a solid and shaped in a small metal pan. The pan can come by itself or in other formats.
- Forms Available-
- Single Pan– A pressed eyeshadow without any excess packaging besides the pan it is pressed into. It can be put into empty palettes with other single pans to create a custom palette. Popular makes from MAC, Morphe, and Makeup Geek.
- Single Shadow– A single pan which comes in it’s own compact container. Popular makes come from MAC, Urban Decay, or NYX.
- Duo– A set which contains two different eyeshadows. Named a duo for the amount of individual eyeshadow pans it contains. Most popularly made by NARS.
- Quad– A set of four individual eyeshadows, Similarly, a set of three would be called a trio. Often these colors will be harmonious so that they will work well with each other. Popular makes from MAC.
- Palette– Any set which contains five or more shadows which have a harmonious color palette and can be used to create an infinite amount of color combinations and looks. Popular Makes from Urban Decay and Too Faced, .
- Foiled Shadows
- Description- A highly pigmented eyeshadow which has a metallic finish and “wet” look when worn.
- Forms Available- Single Pan
- Popular Makes- Makeup Geek
- Mousse Shadows
- Description- An eyeshadow which seems wet to the touch when sitting in the container, but applies dry.
- Forms available- Most commonly found in a pot with a screw on lid to preserve moistness.
- Popular Makes- Colourpop Cosmetics, Stila Magnificent Metals
- Pigment Shadows
- Description- Eyeshadow which is purely to color pigment itself with no added fillers.
- Forms Available- Always loose in a capped pot or container.
- Popular Makes- MAC, Makeup Forever, Bare Minerals
- Cream Shadows
- Description- An eyeshadow which is in a creamy paste sort of form.
- Forms Available- Mostly found in a pot with a screw on lid as well to keep it from drying out.
- Popular Makes- Maybelline Color Tattoo, Chanel, MAC, Makeup Forever
Eye Shapes
Everyone has a unique set of eyes. In general, most are almond shaped, however some can be rounder or more narrow. Here are the most common crease types and orientations in eyes so that you can better understand how to apply eyeshadow to your unique set of eyes in the most flattering way.
Ps: Sorry if these eyes look kinda funny- I’m not the most skilled digital illustrator yet.

- Crease Shape
- Monolid- Most commonly found among those with Asian heritage, where when looking at the eye straight on, there appears to be no visible or defined crease.
- Double Lid (not pictured)- Eyes with a visible fold along the lash line. Similar to hooded eyes, but the eye socket is not as deep.
- Hooded- An eye shape where the crease is at the same depth or slightly more raised that the socket of the eye, creating the illusion that the skin of the crease is a “hood” of sorts.
- Deep set- When the depth of the socket is set farther back, creating a deep crease and the appearance of the eyes slightly receding into the skull.
- Protruding- The eyeballs are set forward in the sockets, creating a very rounded crease and giving the illusion of the eyes “popping” out of the face.
- Eye Orientation
- Upturned- The outer edge of the eyes are pointed upward closer to the brow, giving a more slanted look.
- Downturned- The outer edge of the eyes are pointed downward towards the cheeks, giving a sort of “droopy” appearance.
- Almond/Neutral- (not pictured) The outer edge of the eye remains along the same line that the pupil falls on.
- Eye Distance
- Widest- Where the corner of eyes are close to the bridge of the nose.
- Close set- Where the corners of the eyes are spaced from the bridge of the nose.
- Neutral- (not pictured) The eyes are a proportional amount of space from the bridge of the nose.
Anatomy of the Eye
This is not the technical biological anatomy of a human eyeball, but the anatomy of the eye in terms of makeup vocabulary. By understanding these terms for the parts of the eye, readers will be able to better understand where the placement of eyeshadow belongs.

- Inner Corner- The corner of the eye closest to the bridge of the nose. Light colors typically go here to add brightness to the inner eye and give a more wide eye effect. Especially useful to highlight for close set eyes.
- Lid- The part of the eyelid which is focused under the crease of the eye. The main focus of color is put on this part. In a colorful look, the star of the show is found here, like in my Spring Mint and Coral Tutorial, while in a neutral look a shimmery light to medium wash would be applied here to draw focus to the center of the eye.
- Crease- The portion of the eye where a visible indent is made due to the socket of the eye under the skin. Medium to Dark colors are concentrated in this area to create the illusion of more depth and dimension to the eye.
- Browbone- The bony portion under the eyebrow that is above the eyelid. Typically a highlight is added here to contrast against the dark outer corner.
- Outer Corner- The corner of the eye closest to the temple. Dark colors are focused here to create depth and dimension.
- Lash Line- Also know as the top lash line, it is the portion of the eyelid closest to where the natural eyelashes grow. This area is where eyeliner is run along or where dark colors are concentrated in a smokey eye (see below).
- Lower Lash Line- The lash line at the bottom portion of the eye where the secondary lashes grow. Typically eyeliner can be applied here, which works very well with round eyes since it defines and gives a definite outline to the eye. Darker shadows can be run along this area and smudged or diffused out to create a smokey effect.
- Waterline- (not pictured) Also known as the inner rims, the little white ring that surrounds the eye and can be tightlined with eyeliner to create a darkness to the eye.
Eyeshadow Techniques
I do not have tutorials for all of these techniques, but I wanted to give a quick explanation for some of the most basic ways to apply eyeshadow.
- Basic/Everyday- For the most part, light colors are focused on the inner part of the eye and work out to darker colors on the outer corner of the eye. You can use any combination of colors that work together as long as the light colors remain on the inside and the dark colors on the outside. I have a basic tutorial which you can find here.

- Smokey- A gradient effect is created by focusing the darker colors closer to the lashline and working out to medium colors up in the crease. The edges are super diffused and there are no harsh lines. Here is an example from my Instagram, but I don not have a tutorial for this look. https://instagram.com/p/x8UlaoD9Zi/?taken-by=chroniclesofmegan
- Cut Crease- There is a defined distinction between the color on the lid and the color in the crease. I featured such a look in my Spring Lookbook last week.


Alrighty, I know this was a super long post, but there are so many things to cover! I hope this was thorough enough to get anyone started in eye makeup. Be sure to look out for the next part of this series next Sunday! Until then, keep up with me using my social media links below.
All my love,
Megan
—
Instagram || Twitter || Google+ || Pinterest || Bloglovin’

This is some great work you have done! Quite a project, and a lot of great information for those just beginning to get interested in makeup!
LikeLiked by 1 person
Yes it’s quite a bit of work but I hope it helps at least one person starting in makeup! Thanks so much for your comment 🙂
LikeLiked by 1 person