


Hey, all! With the Summer finally in full swing, I decided now would be an appropriate time to put together a makeup tutorial that embodies this particular season. If you’re a regular reader, you might recall my Spring Mint & Coral tutorial from a few months ago, which I felt like I just wrote for you all. Anyhow, similarly to how I chose the pastel colors for my Spring tutorial, I chose bright, vibrant colors that went along with the feel of the season. This isn’t the most wearable look and is definitely not for everyday, but if you have a music festival, concert, or party this look would work nicely. If you don’t have any of these events or colors aren’t your thing, I also included an everyday option, so don’t you worry! However, since these are lengthy events, I designed this look to be longwearing, but I will note where you can make substitutions in case you don’t want a look that lasts for 12 hours. This look is mostly neutrals on the eye with a pop of electric blue on the lid and a bright pink lip. It features mostly the Lorac Pro Palette, along with a few other shadows. If you would like to see a tutorial exclusively with the Lorac Pro Palette, let me know in a comment below! Okay, let’s finally get started!

- Start with your base. I did something a little different this time, so I thought I would include it in this tutorial. I used the Smashbox Primer Water to prime the face and went back over with the Smashbox Photofinish Primer to smooth out the skin for photography purposes. If you are wearing this look to an event, go ahead and use that second primer to prolong your foundation’s staying power, but if not skip this step. If you are going to be outdoors or have super oily skin, substitute a mattifying primer for the primer water to make sure your makeup lasts. I mixed my longwear foundation, Revlon Colorstay for Oily/Combo skin, with a little bit of a gold liquid luminizer. This is Buxom’s Divine Goddess Luminizer. I applied the concoction with a Beauty Blender.
- Prime the lids. Use a clean finger to apply eyeshadow primer as you normally would and then follow up with a gold cream shadow. This is the Maybelline Color Tattoo in Bold Gold, which I featured in my Basic Makeup Kit post.
- Using the Lorac Pro Palette, take a small blending brush to the color Sable. Apply the color in the outer third of the lid, concentrating right at the corner and using whatever remains on the brush to blend towards the crease.
- On the inner third of the eye, take the Gold shadow on a fluffy blending brush and sweep that above the lid to transition the gold cream lid color from Sable.

- Using a fluffy but dense dome blending brush, blend away the harsh edges above the crease with a matte red-toned medium brown. This color is from my Sonia Kashuk Mattes palette, but if you do not want to use excessive shadows, Taupe form the same Lorac Pro Palette as before will do, the look will just be a little more yellow toned.
- If you want to take a more wearable, everyday route, then you can go ahead and apply the Light Bronze shadow from the Lorac palette as your eyelid color instead of the turquoise and resume on step 8. This is what the look should look like.
- If you want to rock the bold colors, take a flat packing brush and pick up a shimmery electric blue/turquoise. This is Painkiller from the Urban Decay Show Pony Palette. This was my first ever palette from Urban Decay and this bright blue is still one of my favorite shadows in my collection to this day. Unfortunately, it is no longer available, but I believe the color is very similar to Urban Decay Deep End or even Makeup Geek Pegasus. Pack the color on top of the gold cream base on the lid, but still leave some of the gold peeking through above, in between the Sable color and the blue. Also bring some of the color into the inner corner and under the inner lower lashline.
- Blend along that leftover gold cream base using the matte Cream color from the Lorac Pro on a fluffy blending brush.

- Curl your lashes and apply your favorite mascara. I used Maybelline’s The Rocket mascara, which I’ve really been loving so far, if you recall my Spring Favorites post.
- Wet an angled liner brush with your choice setting spray or just a bit of plain water, whatever you have on hand. Take the damp brush and pick up a little of the Espresso shadow from the Lorac Pro and create a slight wing, using the wet powder as a liner.
- Use a dark teal blue colored liner to define the entire lower lashline. I used Makeup Forever’s 12L. Even if you went the more wearable route, you can still take this step to add a pop of color like my first look in my Spring Lookbook, or substitute it with a brown liner.
- Fill in your brows as you normally would. I use my typical Sonia Kashuk brow palette with and angled brush.

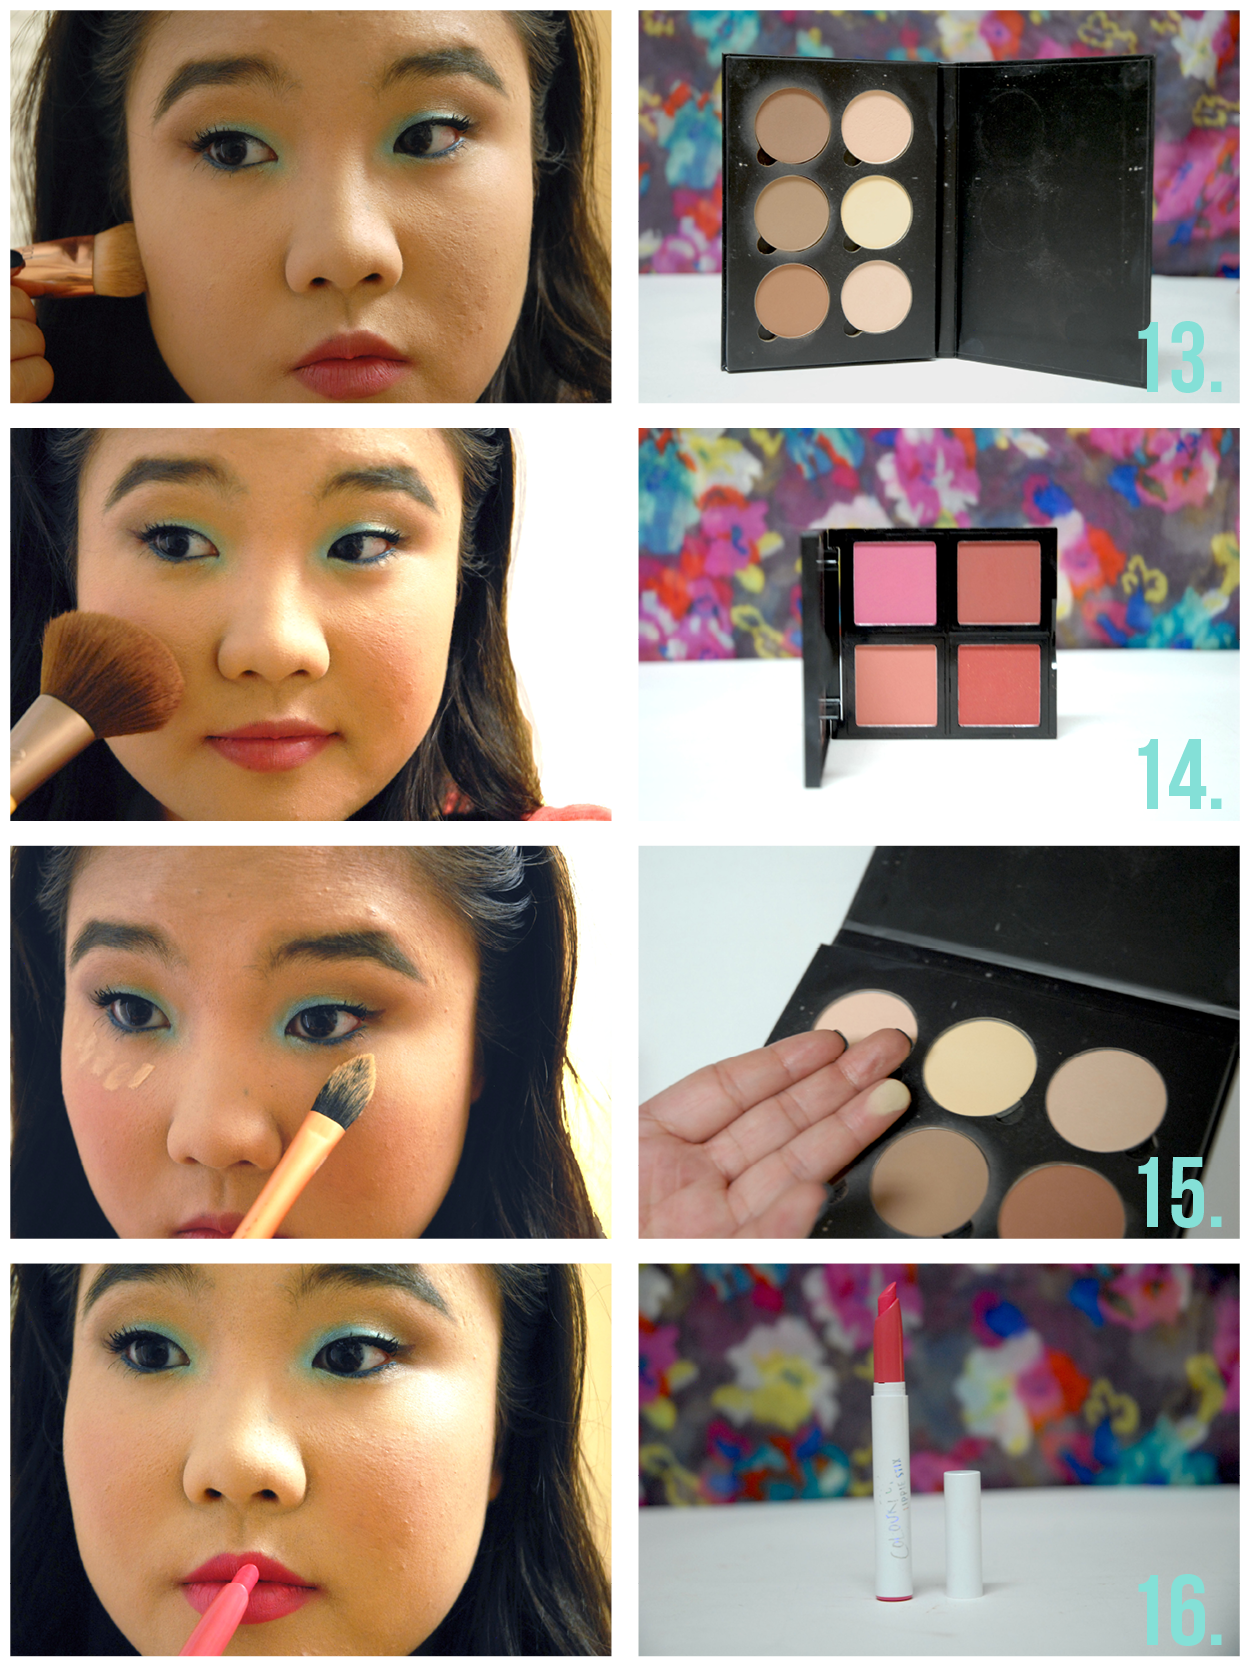
- With my Anastasia Contour Kit, I mixed the Java and Fawn shades to create my perfect contour shade. I began with my Real Techniques Contour brush and then blended out with my MAC 168, but use whatever tools you normally would. I contoured along my cheeks, temples, and forehead.
- Using my ELF blush palette in dark, I applied the Coral peach toned shade in the upper left corner (when you are looking at the palette right side up, not as pictured) to the apples of my cheeks with a fluffy blush brush.
- I applied my Collection concealer in a check-mark shape under my eyes to highlight and create brightness under my eyes. I then set the concealer with the Banana Powder from the Anastasia Contour Kit.
- Apply a bit of chapstick if you desire then smooth the lips over with a bit of silicone based primer. I used some leftover Smashbox Photoprimer from when I applied it initially, but you can also use the Colourpop Lip primer or something similar. This will help apply the lip color smoothly. I find with the satin formulas especially, that it is hard to get an even application, and this step is highly crucial in preventing any weird creasing or flaking. Finally, finish off the lips with the Colourpop Lippie Stix in Punky.

- Finally, finish off with a setting powder and spray. I used my typical Tarte Smooth Operator powder and Urban Decay De-Slick spray.


This is the final look! I hope you enjoyed this tutorial, and try it yourself! I know that it’s not everyone’s cup of tea, but I hope that the substitutions will help this look be more suitable for anyone. If you recreate it, be sure to tag me using my social media links below! Thanks for reading this week and I’ll catch you soon!
All my love,
Megan
—
Instagram || Twitter || Google+ || Pinterest || Bloglovin’

Love it!! I’m
LikeLike
Going to have to try this 🙂
LikeLiked by 1 person
Please do & post a picture! I’d love to see it! Thanks for leaving a comment 😊
LikeLiked by 1 person